

This Mini Quiche recipe is perfect for prepping ahead for a grab-and-go breakfast, to have as part of a breakfast or brunch spread, or as an appetizer at the holidays! They’re super easy to make, and you can easily change their flavor with a few simple twists.

Mini Quiches only take 20 minutes of prep, including making the pie crust from scratch!
They’re filled with a creamy and cheesy filling with smoky bacon, fresh spinach leaves, and tangy green onions.
You can change up the kind of meat, veggies, cheese, or seasonings used to make them your own.
You can even leave out the crust and make it a crustless mini quiche recipe!
They’re perfect for a grab-and-go breakfast as they’ll last up to 4 days in the fridge – you can pick one up on your way out on busy mornings.
I love them at a brunch party or holiday breakfast, too — their small size makes them perfect for adding to a large spread!
For more delicious quiche recipes, check out my Easy Ham Quiche Recipe, Quiche Lorraine, Easy Loaded Baked Potato Quiche, or this Crustless Quiche!
Ingredients Needed:

- Quiche Crust: use my homemade pie crust or store-bought pie crust.
- Bacon: thick-cut bacon works best for this recipe to add some meaty substance and a smoky flavor.
- Eggs: eggs are the base of any quiche filling.
- Evaporated Milk: makes the mixture creamy and fluffy, but you can use half and half if you prefer.
- Seasoning: use salt, black pepper, and dried parsley for these quiches.
- Cheese: I like to use shredded cheddar cheese to add a cheesy flavor, but you can use your favorite kind.
- Spinach: fresh spinach is perfect to add color and nutrients without an overpowering flavor.
- Green Onion: adds a fresh, tangy flavor to the mini quiches.
How to Make Mini Quiches
This recipe is quick and easy to make! Full instructions are included in the recipe card below.
Quiche Crust
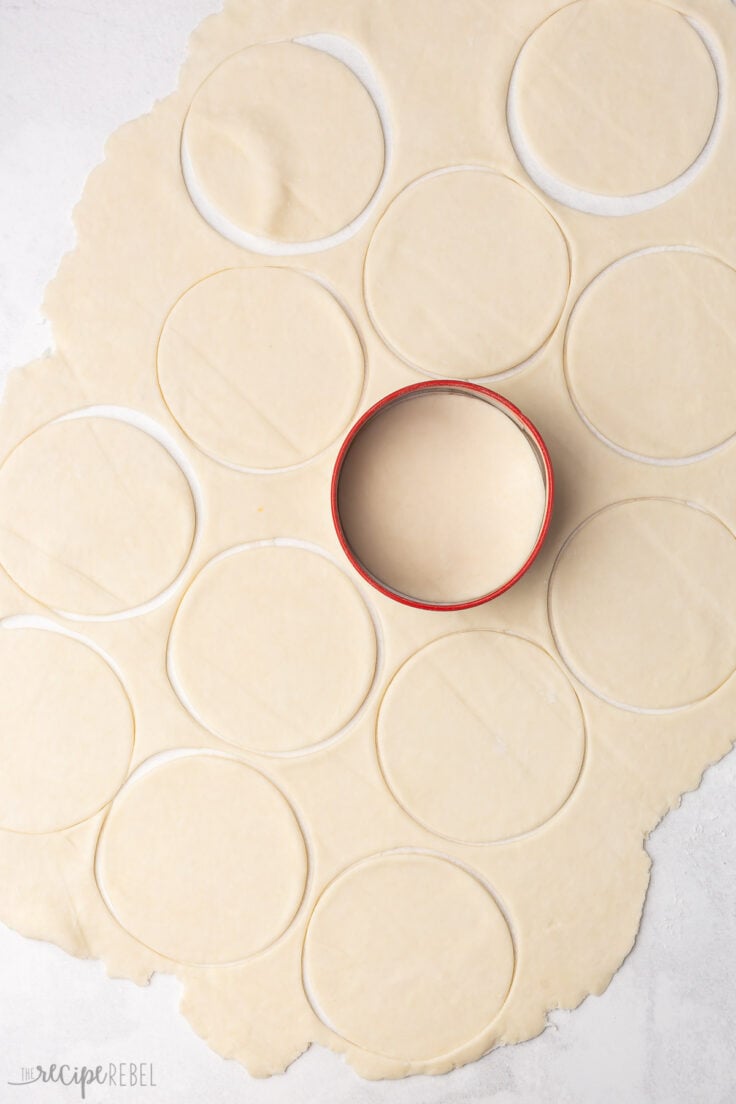
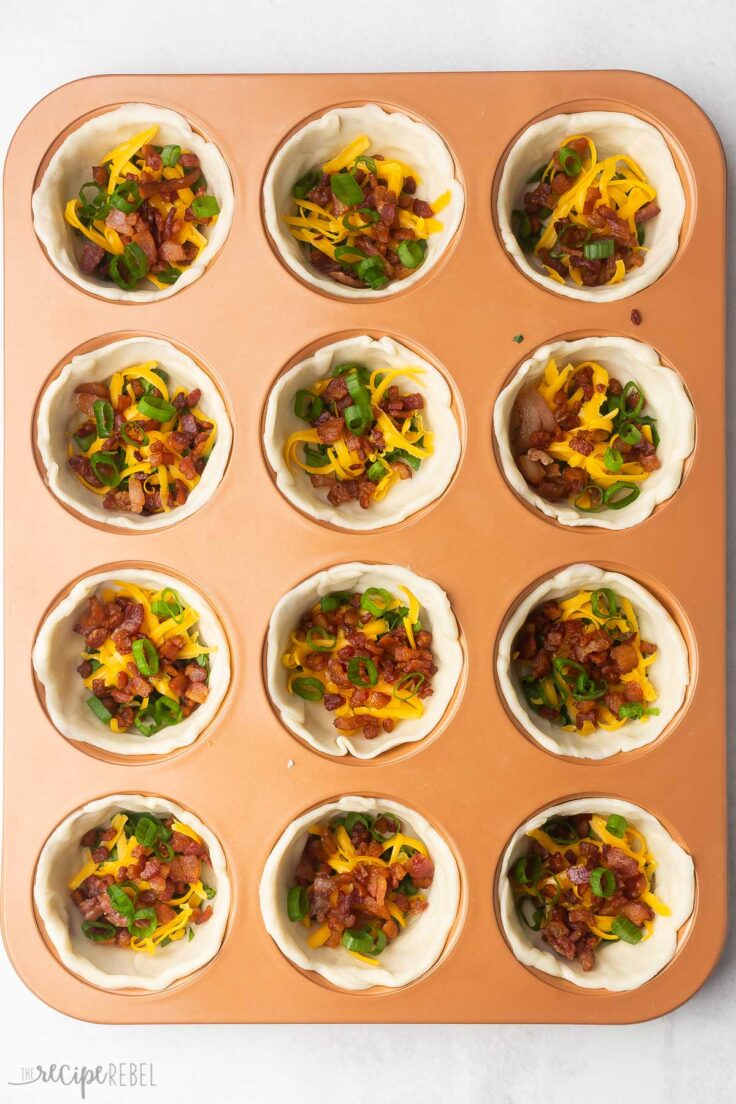
- Make pastry circles: Prepare the crust and roll it out on a lightly floured work surface. Use a round cookie cutter to cut out circles.
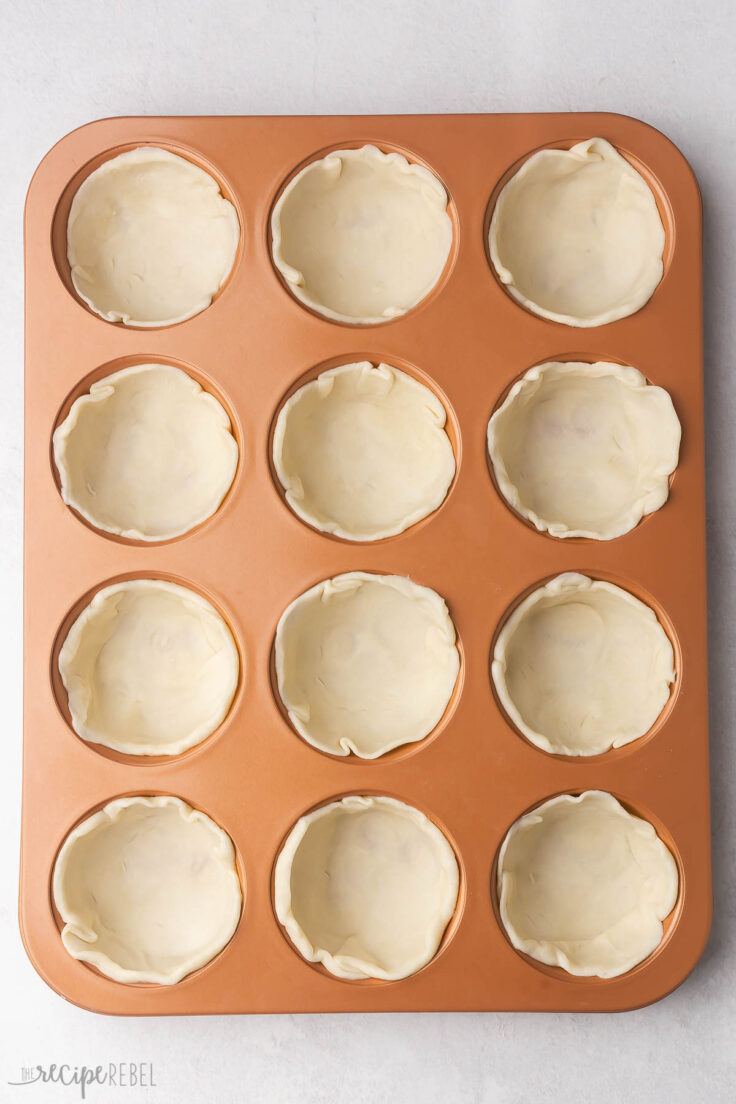
- Place in a muffin pan: Place the pastry circles into the muffin pan and press it in to fit into the bottom and up the sides. Cover with plastic wrap and refrigerate.
Mini Quiche
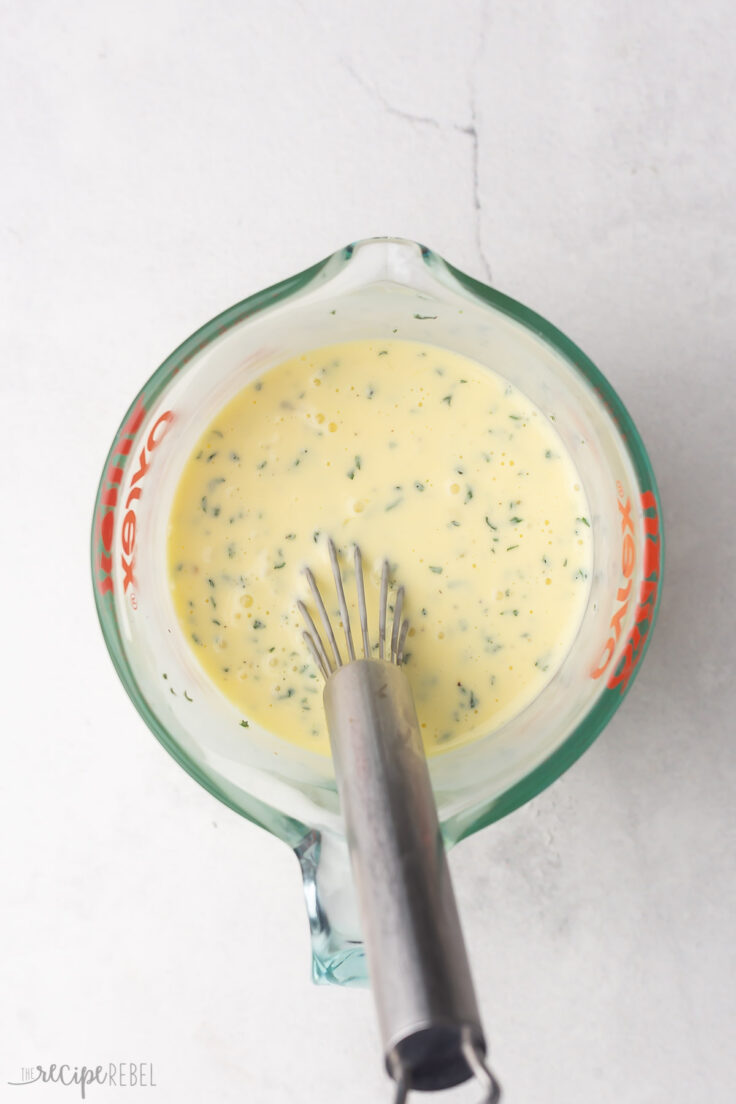
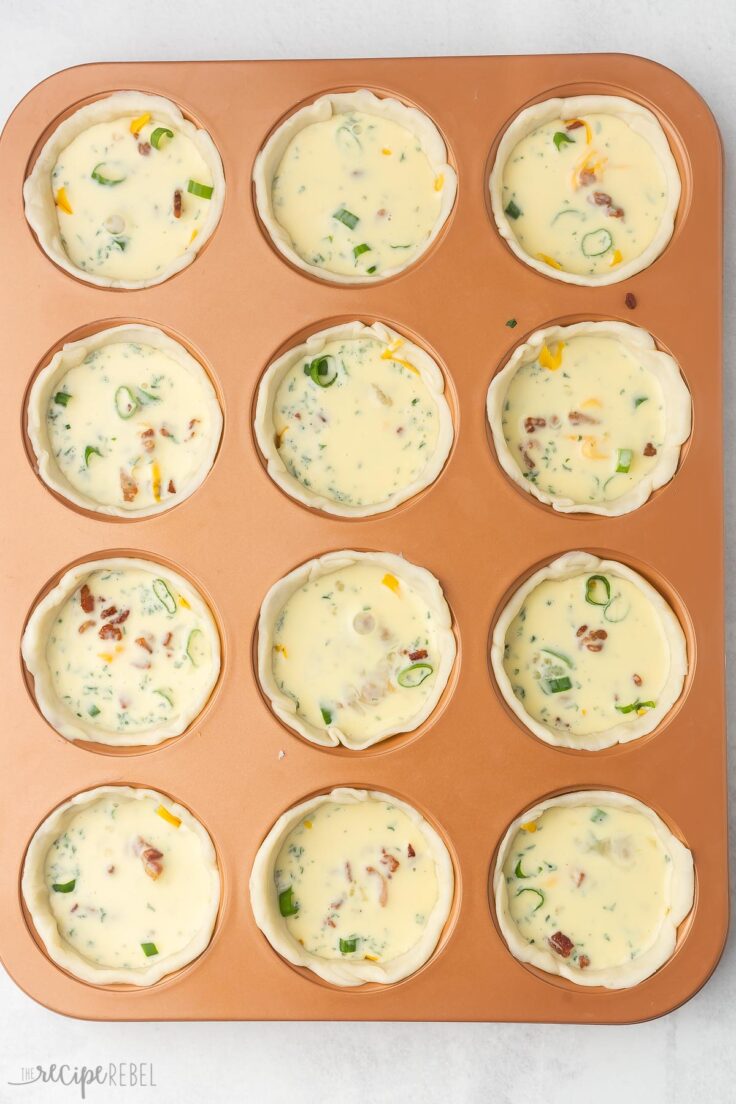
- Make egg filling: In a medium bowl, whisk together the eggs, milk or cream, salt, pepper, and parsley.
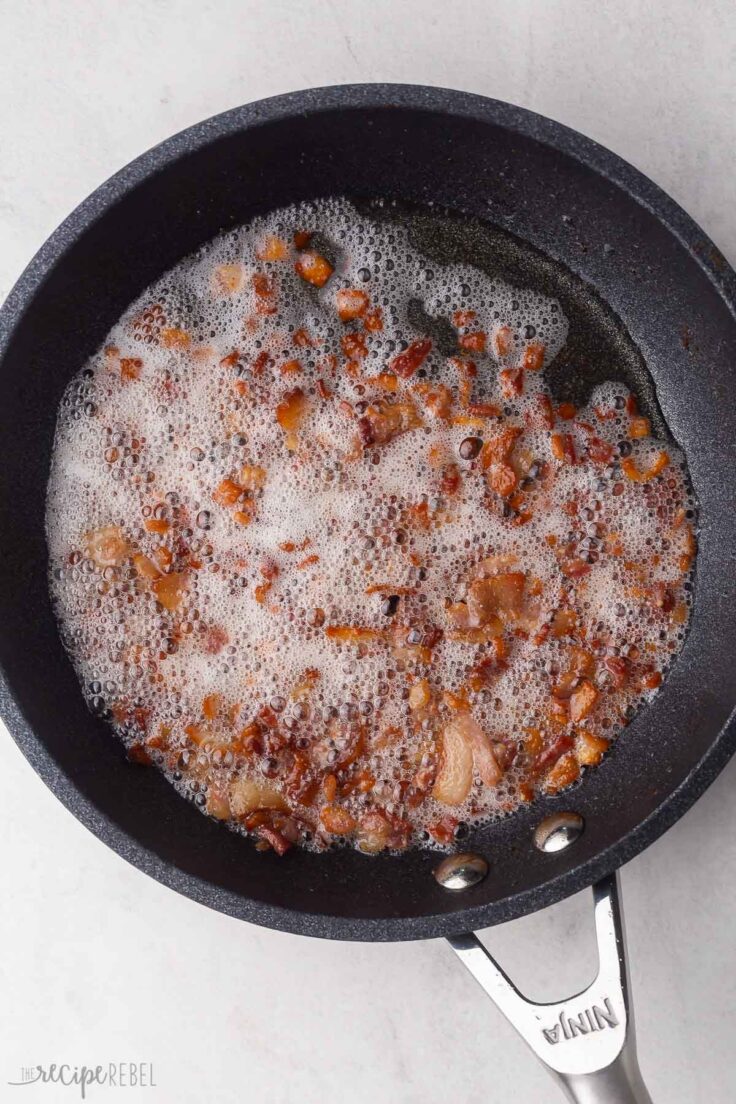
- Cook bacon: Cook bacon until crisp and remove the fat.
- Fill pastry cups: Divide cooked bacon, cheese, spinach, and green onion between the quiche crusts.
- Add egg mixture: Fill with the egg mixture, nearly to the top, and bake.
Mini Quiche FAQs
Store your Mini Quiches in an airtight container or covered in plastic wrap in the refrigerator for up to 4 days. Allow them to cool to room temperature before putting them in the fridge. You can reheat them in the microwave briefly if you like or enjoy them cold!
You can even freeze them for up to 3 months. To freeze them, flash freeze them until solid, then wrap them in plastic or foil and put them in a Ziploc bag in the freezer. Thaw overnight in the freezer if frozen, then enjoy cold or warm in the oven or in the microwave.
To reheat in the oven, preheat to 350 degrees F and place the quiche on a baking sheet. Cook until warmed through!

Tips and Notes
- Muffin Pan. Call me crazy, but I make this mini quiche recipe in a regular-sized muffin tin, not a mini muffin pan. I figure a muffin pan makes a mini quiche. Regular-sized quiches would be made in a pie plate or tart pan, and I like to get a little more egg and a little less pastry than you would if you used a mini muffin pan. You can absolutely use a mini muffin pan and make twice as many!
- Pie Crust. I’ve used my homemade pie crust for the best flavor here, but a store-bought pie crust will give you a head start and save you some time if you prefer!
- Cutter. I use a 3.8-4″ round cookie cutter to cut the pie crust into small circles for my muffin pan. You can use a biscuit cutter too. If you use a mini muffin tin, you’ll need smaller circles.
Mini Quiche Variations
- Make it Gluten-Free. Use a gluten-free pie crust from the store or a gluten-free pie crust recipe.
- Change up the cheese. I love using guyre cheese for my Quiche Lorraine recipe, and that would work well here too. You can also try mozzarella cheese for a milder flavor or Pepper Jack cheese for a bit of a kick.
- Use other veggies. There isn’t much space in these bite-sized quiches, so there’s only so much I would add in. You may be better off substituting half of something for half of something else if you’re going to change the filling. Try chopped bell pepper, jalapenos, mushrooms, sweetcorn, or chopped broccoli!
- Spice it up. Add some red pepper flakes, chili powder, or hot sauce to the filling mix to add some spice to these bites.

Serving Suggestions
Try these mini quiches along with some other mini quiche recipes like these Mini Spinah and Roasted Red Pepper Quiches, Mini Wonton Quiches, or these Mini Mexican Wonton Quiches.
Serve them on your appetizer table with my Potato Salad Bites, Jalapeno Poppers, Bacon-Wrapped Smokies, or these Maple Glazed Chicken Drumsticks.
They’re also great with your cooked breakfast or for brunch with my Tater Tot Breakfast Casserole, Breakfast Potatoes, and my Breakfast Stuffed Peppers.
More Amazing Appetizer Recipes


Mini Quiche recipe
written by Ashley Fehr

Ingredients
Quiche crust
- 1 batch homemade pie crust , (or you can use 2 store bought pie crust rolls)
Mini Quiche
- 4 slices thick cut bacon, (chopped)
- 4 large eggs
- ¾ cup evaporated milk or half and half
- ¼ teaspoon salt
- ⅛ teaspoon black pepper
- ½ teaspoon dried parsley
- ¾ cup shredded cheese
- ½ cup fresh spinach, (finely chopped)
- 1 green onion
Instructions
Quiche crust
- Prepare the crust according to the recipe.
- Roll the pastry out on a floured surface (I like to do this on a piece of parchment paper) and use a 3.8-4" round cookie cutter to cut circles. Place each circle into one muffin cup and press it in to fit into the bottom and up the sides.
- Repeat until you have 10-12 quiche crusts — re-rolling the pastry as needed.
- Cover with plastic wrap and refrigerate at least 1 hour for best results.
Mini Quiche
- Preheat oven to 350 degrees F.
- In a medium skillet, cook bacon until crisp. Remove from the fat and drain on a paper towel. Set aside to cool.
- In a medium bowl, whisk together eggs, milk or cream, salt, pepper and parsley.
- Divide cooked bacon, cheese, spinach and green onion between prepared quiche crusts. Fill with egg mixture nearly to the top (leaving about ¼-½" at the top). If you have extra egg mixture, simply bake a few crustless quiches in a lightly grease muffin cup.
- Bake for 20 minutes or until eggs are set all the way through.
- Allow to cool in the pan for 10-15 minutes before removing to serve.
Notes
- I roll my crust super thin and easily get 12 quiches with this recipe. If yours is a little thicker, you may only get 10.
- If you have extra eggs left over, simply grease an extra muffin cup and bake without the crust!
- Pie crust: one recipe of my homemade pie crust will yield 10-12 mini quiches (in a regular muffin pan). If you are using store-bought pie crust, I recommend purchasing two rolls since I find them thinner than my homemade crust.
- Fillings: you can swap the bacon, cheese, and vegetables for any you prefer! The options are endless.
- Store: Store your Mini Quiches in an airtight container or covered in plastic wrap in the refrigerator for up to 4 days. Allow them to cool to room temperature before putting them in the fridge. If you like, you can reheat them in the microwave briefly or enjoy them cold!
- Freeze: You can even freeze them for up to 3 months. To freeze them, flash freeze them until solid, then wrap them in plastic or foil and put them in a Ziploc bag in the freezer. Thaw overnight in the freezer if frozen, then enjoy cold or warm in the oven or in the microwave.
Nutrition
Nutrition information is automatically calculated, so should only be used as an approximation.
Want to save this recipe?
Create an account easily save your favorite content, so you never forget a recipe again.
Tried this recipe?
Tag @thereciperebel or hashtag #thereciperebel — I love to see what you’re making!
Tag @thereciperebel

JaniceJ says
Hi.I’d love to try this recipe, but using my 4″ tart pans. How long should I bake the quiche for? Also, how thick do you roll out your pastry cutting?
Ashley Fehr says
Hi Janice! Unfortunately I have no experience with this, but you are welcome to experiment and see how it goes.
Brenda says
Ashley, this recipe is delicious to say the least. Thank you so much for sharing. I made mine just like your recipe and the only thing I changed was I used heavy cream instead of evaporated milk. They turned out wonderful and our company visiting with us for a few days absolutely loved them! I am a Southern cook, so I served them with a Hash brown casserole, cheese grits, some homemade buttermilk biscuits and a nice big bowl of assorted fresh fruit. It was a great breakfast indeed! Thank you again!
The Recipe Rebel says
Hi Brenda! So glad you enjoyed the recipe! Thank you for this kind review!
Ingrid says
Can I use puff pastry instead of pie crust?
The Recipe Rebel says
I’m sure you could. Enjoy!