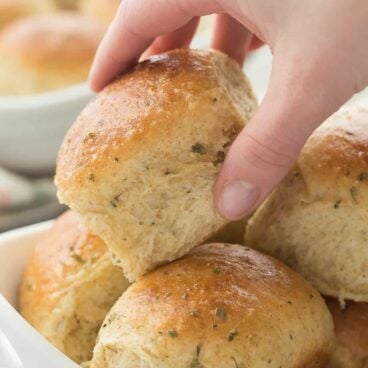
Homemade dinner rolls that are easier than you think, with a step by step recipe video and tons of garlic herb flavor! They’re perfectly soft and fluffy. Includes how to recipe video

I’m curious: how often do you guys make your own yeast breads, buns or rolls?
For me, I think it actually used to be something I did more often a year or two before (right when I posted these Buttery Bread Machine Rolls), but lately I haven’t been into it that much. It’s easy to find good quality bread and buns these days (and they’re inexpensive, too!), so often I give in and just buy it.

But I think there’s nothing as therapeutic for me as playing with yeast dough in the kitchen when I’ve got nowhere else to be. It’s such a labor of love, and the results are out of this world (and yes, there are some great store bough or bakery breads but nothing like the bread you make yourself!). It also opens up the world of other yeast breads — cinnamon buns or these Homemade Dinner Rolls perhaps??
One benefit of making your own bread is you can sample it just minutes after it’s out of the oven (<— amazing). Also, that smell.

I am a bit obsessive when it comes to good smelling things. Hand soaps, lotions, shampoos, cleaning products, wax melts. Ooooh, my wax melts.
I think I have about 20 different scents in my stash and I am always on the hunt for more.
And let me tell you — if they made one that captured, “Fresh Homemade Bread”, I would be all over it. That and banana bread. If someone as equally enthusiastic as I am could dream those up for me, that would be great, thanks. Maybe a new line of products here on The Recipe Rebel? Kitchen inspired wax melt scents?
Don’t encourage this madness. Just keep scrolling.

And since it’s not summer yet, I’m still in full-blown soup-with-a-side-of-bread mode, and these Garlic Herb Rolls are perfect for dunking. They are soft, fluffy, and flavorful but not overpowering. No need to be intimidated if this is your first time baking with yeast! You’ve just got to take it slow and not rush the rise — that’s what’s going to get you those fluffy buns.
Looking for more homemade bread recipes? Try this No Knead Artisan Bread or this Whole Wheat Bread!
Homemade Garlic Herb Dinner Rolls
written by Ashley Fehr
Ingredients
- 1 cup warm milk, not hot — I microwave on high for about 45 seconds
- 3 teaspoons instant yeast
- 1/2 cup butter, softened
- 1/4 cup sugar, 50g
- 2 eggs
- 1 teaspoon salt
- 1 teaspoon garlic powder
- 1/2 teaspoon parsley
- 1/2 teaspoon basil
- 1/2 teaspoon thyme
- 2 cups whole wheat flour (or use all purpose), 250g
- 2 cups all purpose flour, 250g
Garlic butter:
- 1 tablespoon butter, melted
- 1/4 teaspoon garlic powder
- 1/4 teaspoon dried parsley
Instructions
- In a large bowl (the bowl of your stand mixer if using), whisk together milk and yeast. Let sit for 5-10 minutes until bubbly — this is how you know your yeast is working.
- Add butter, sugar, eggs, salt, garlic powder, parsley, basil and thyme and mix with whisk or stand mixer until eggs are beaten (butter may still be a little chunky, and that's okay).
- Add the flour gradually, one cup at a time, and mix with a dough hook (or your hands!). Add just enough so that the dough is smooth but slightly sticky. Place in a greased bowl and turn to coat the ball of dough. Cover with plastic wrap or a clean towel and set in a warm place to rise for 60-90 minutes, until doubled.
- Lightly grease a 9×13" pan and roll dough into 12-14 balls, creating as smooth a top as possible. Place in pan with the seam down and cover to let rise for about 30 minutes, until doubled again.
- Meanwhile, heat oven to 350 degrees F.
- Bake for 22-25 minutes, until medium golden brown.
- Garlic butter: Stir together melted butter, garlic powder and parsley and brush over rolls if desired. Serve warm.
- These freeze perfectly, so make a big batch to keep for later!
Video
Notes
Nutrition
Nutrition information is automatically calculated, so should only be used as an approximation.
Want to save this recipe?
Create an account easily save your favorite content, so you never forget a recipe again.
Tried this recipe?
Tag @thereciperebel or hashtag #thereciperebel — I love to see what you’re making!
Tag @thereciperebel

Mai huong says
I really surprised on this recipe. After all steps i got the best results on herbed rolls. Soft, light and fluffy with garlic and rosemary. I replaced thyme to rosemary cause i think thyme quite strong for me in this recipe.Thank you for sharing amazing recipe.
Ashley Fehr says
Thanks Mai! I’m glad to hear that!
Ashley says
These look amazing. Going to make them soon, but I have a question. Do you think these can these be frozen
Ashley Fehr says
I definitely think so! I would warm them slightly before serving.
Cookies4kids says
These rolls turned out as light and fluffy as can be. It was hesitant to try the recipe because so many people posted that they were biscuit like and did not rise. I believe it may be because they did not let the machine knead the dough long enough to develop the gluten properly. You must let them knead for a good 5 minutes in the mixer before turning out the dough for the first rise. They are absolutely beautiful and will be a favorite recipe.
Ashley Fehr says
Thanks! I’m so glad you like them! Another problem can be if people add too much flour, as it’s important to fluff the flour and not pack it into the cup.
Markell S says
SOS My rolls turned out like biscuits. Did I do something wrong??
Ashley Fehr says
I can’t say I’ve ever had them turn out that way so I’m not sure what could have gone wrong. Was maybe too much flour added?
Brooke Giannoulis says
Mine also turned out with a biscuit consistency and I used 3 cups flour instead of the 4.
Ashley Fehr says
Hi Brooke! I’m sorry to hear that! As long as you quit adding flour when the dough reaches the correct consistency (as noted in the recipe), there shouldn’t be any reason for them to turn out like biscuits. A cup of flour can be anywhere from 125 to 175 grams so it’s important to either weight the flour or go by the feel of the dough. I hope that helps!
Jessica Barton says
If the milk is to hot the yeast will not activate properly. Same if it is cold.
Gina says
Hi Ashley, i made the bread tonight. It was my first time to bake a bread with yeast. The top did not brown and was crusty. Is tthe bread suppose to be with a crusty top?. Im not sure if i over proof it. I notice that it did not grow while baking and it took longer than 25 mins.
What did i do wrong?
Thanks!
Gina
Ashley Fehr says
Hi Gina! I’m so sorry that happened 🙁 The top should definitely brown slightly, it sounds like there may have been too much flour added to the dough?
Donna says
For the herbs,do you use dried or ground herbs?
Ashley Fehr says
I used dried
Veronica says
These are delicious. I veganized the recipe. I used coconut milk from a can because that was all I had, follow your heart vegan butter and egg replacer (red mill brand). I was nervous but the recipe was so easy they worked out very tasty. I also doubled the seasoning because I wanted a stronger flavor. I imagine non veganized these would be amazing but as I made them they are delicious and I’d make them again. I have a stand mixer but was to lazy to use it.
Ashley Fehr says
Thank you for sharing your swaps! I’m so happy they turned out well for you!
Meg says
I’m hoping to make these for Thanksgiving at my sister’s house, but the oven will be busy with other dishes! If I bake them the day before will they still be good? Any hints?
Ashley Fehr says
They will definitely be good but if possible I would warm them in the oven on a low temp for just a bit before serving. In a pinch, the microwave will do.
Leigh says
Can i use Savory Nutritional naturl yeast flakes instead or instant yeast?
Ashley Fehr says
I can’t really say as I have never worked with them before.
sleepy gary says
You can certainly add nutritional yeast, but keep in mind that nutritional yeast is dead, so it will not have the same leavening properties as active yeast.
Joanne says
If making a batch to freeze, should they be just rolled out and then froze….or should they be rolled out and then let rise before freezing?
Ashley Fehr says
I think you could do it either way but for best results you may want to try freezing before rising, and then letting them thaw and rise for several hours at room temperature before baking
Shey says
Do you do the first rise, before rolling and freezing? Also how’s long in Freezer before putting rolled rolls in a bag? Do you cover during the flash freeze or just leave on pan? Sincerely Sheila
Ashley Fehr says
Hi Sheila! I actually usually bake completely and then freeze. They reheat easily in the microwave on top of a paper towel or on low heat in the oven after thawing! You should be able to roll the buns, then flash freeze (I would thaw and do the second rise just before you bake), and place in a freezer bag. I would flash freeze on a baking sheet just until they’re firm to touch but not leave them too long. I hope that helps!
Melanie says
I came across the recipe today and my sister is having Thanksgiving dinner at her house tomorrow, so it’s too late for me to make these for that dinner. I’m planning to make them for Christmas dinner instead.
How easy is it to make the dough without a stand mixer? I don’t have one and I’d like to give these a try. My poor parents and sister’s family are guinea pigs for new recipes.
Ashley Fehr says
You know, I rarely knead dough without a stand mixer so I’m not the best judge! It’s definitely doable! You’ll just need a lot of muscle 😉
Susan says
I just made them and did it all by hand. I used a hand whisk, and when I added the sugar & butter I switched to a wooden spoon, and continued with the spoon after the flour was added. I had to add just a tad more flour and use my hands before putting into the lightly greased bowl for it to rise the first time. I have arthritis and DDD in my neck and it affects my arms, I did good today.
Ashley Fehr says
That’s very impressive! It’s a lot of work to knead dough by hand! I hope they turned out well for you 🙂
Kellie says
Made them with bread flour versus all purpose and they turned out like biscuits somehow??
Still very tasty! Just not the soft goodness I wanted! Will try again and see if they get better!
Ashley Fehr says
That is strange! I’ve never tried with bread flour, but I think it should have worked fine?
Monique says
These were so light & fluffy but needed more than called for amount of seasonings! Followed recipe as stated & were delicious; amount of seasonings certainly a matter of personal taste!! Adding this recipe to my numerous bread/roll collection! ?
Ashley Fehr says
So glad to hear that! We find them quite flavorful, so I think it’s always a good idea to start small and add in more if it suits your tastes 🙂
Letha says
I made them. My was dense and heavy in texture.
I added more seasonings and two tablespoons of honey.
How do i get them fluffy?
Ashley Fehr says
I’m sorry to hear that! They are best fresh out of the oven or warmed, but they shouldn’t be dense and heavy. I would make sure that your yeast is still good and your water isn’t too hot or too cold as that will help make your rolls extra fluffy.
Mario says
Could I use bred or strong flour to make the dough??
Ashley Fehr says
I’m sure that will work just fine, though I’ve never tried it myself.
Caitlin gannon says
I made these tonight and they tasted like they were missing something. Almost tasted blan/ flavorless. Only thing I can think of is not enough salt. Might try making them again because the dough smelt wonderful.
Ashley Fehr says
I’m sorry to hear that. I’ve never though that they were bland! Everyone has different tastes 🙂
Rosemarie says
I’d like to try this recipe. I am a novice at bread making. Can I use bread flour and all purpose or only one type?
Ashley Fehr says
I have never tried this recipe using bread flour, so I can’t really say. I try to keep my recipes to regular all purpose or whole wheat flour just for simplicity. I don’t think you need bread flour, but you can definitely try it!
Justine says
I don’t have wheat flour so would I use 4 cups of all purpose flour?? Thank you!
Ashley Fehr says
Yes that works just fine!
Tammy says
Great roll recipe. The recipe makes 12 large rolls. I have made this recipe twice now. I used 1t. salt and doubled the spices the second time and we enjoyed the extra flavor. These rolls are easy to make and freeze well. Thanks for the recipe… will definitely be make again!!
Ashley Fehr says
I’m so happy to hear that!
Susan Sackmary says
Can you use all whole wheat flour instead of the two cups of all purpose flour?
Ashley Fehr says
You definitely can! They will be a little denser. I would just make sure to let them rise well 🙂
Chaitali says
Is there any way to skip egg in this recipe else all looks amazingly yummy.
Please advice an alternate for eggs.
Ashley Fehr says
I can’t really advise an alternative to the eggs, but there are lots of dinner rolls recipes made without eggs if you take a look. I hope that helps!
Jenni says
You can remplace eggs by using water and chia seeds. I’m not sure about the proportions, you can google it.
Good luck!