
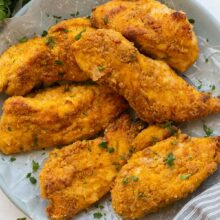
This easy Oven-Fried Chicken turns out perfectly crispy and juicy every time! The special seasoning blend tastes just like KFC, but it’s made with wholesome ingredients in your own kitchen.

This recipe has been updated and republished since its original debut in 2014.
Table of Contents
Perfectly Crispy “Fried” Chicken in the Oven
I seriously love chicken.
Whether it’s One Pot Chicken Lo Mein, Caprese Chicken and Rice, or this simple Slow Cooker Chicken Breast… you name it, we love it.
This year, since I really got into using my Instant Pot, I’ve been especially enjoying making chicken breasts in there (check out my tutorial on how to cook chicken breasts from frozen!). But one thing the Instant Pot cannot do is produce crispy, oven-fried chicken.
And that’s why we’re here 🙂
This oven-fried chicken breast recipe is perfectly crispy and juicy, without fail. It captures that KFC, special-herbs-and-spices flavour, without all of the deep frying and processed ingredients that go into the fast-food version.
Most of all, this is a recipe our family loves, and that we make over and over again. The last time I made it, it got rave reviews from our newest taste tester: our 10-month-old daughter! I know it’s a good one when she bounces up and down in her high chair, saying, “Mmm, mmm, mmm!” (and becoming upset when it’s not on her tray fast enough).

What You’ll Need to Make Oven Fried Chicken
For this recipe, I use chicken breast, but you could substitute chicken thighs, chicken tenders, chicken wings, or even legs. The seasonings and crispy coating are always delicious! Just remember that the cooking time will vary according to the cut of chicken.

- Chicken Breast: One batch of this recipe makes about 3-4 chicken breasts, or around one and a half pounds, cut into strips. One chicken breast equals about three strips, the way I cut them.
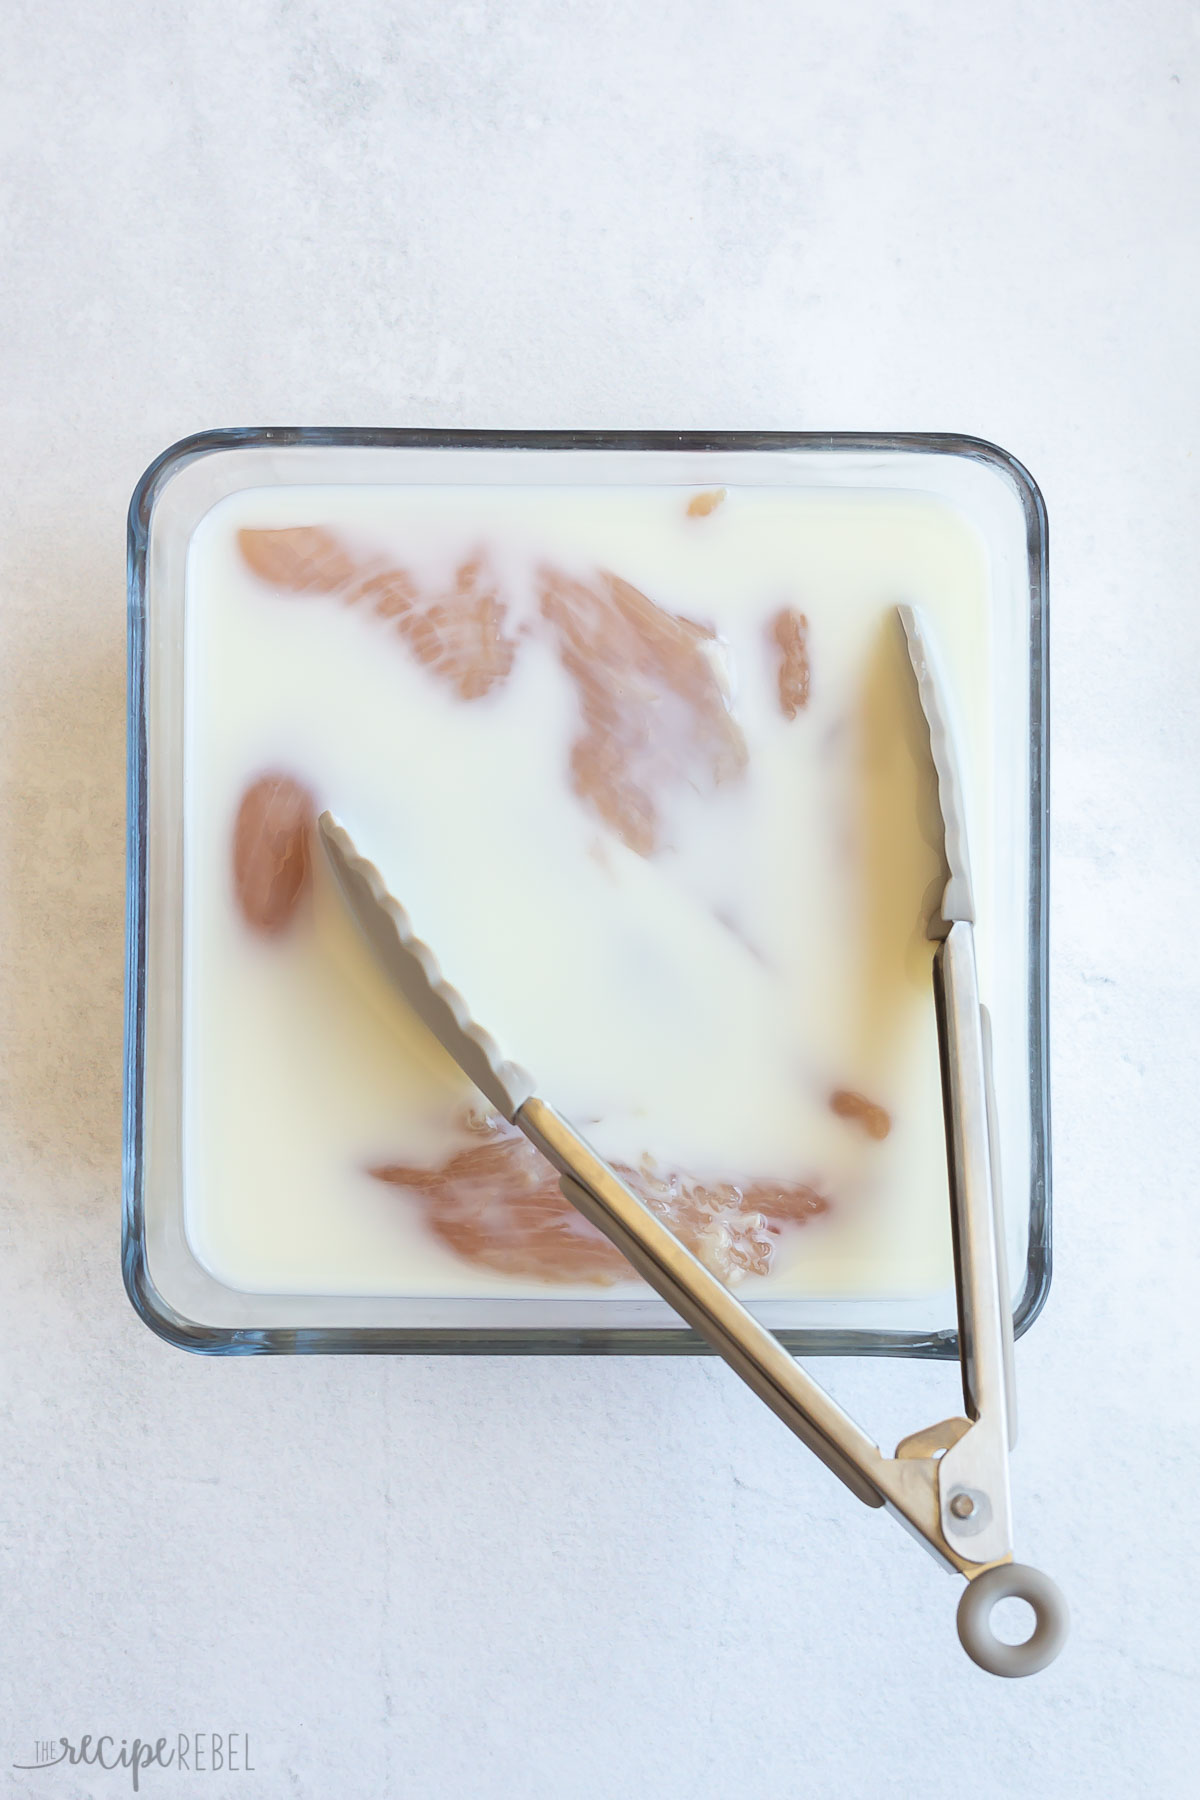
- Buttermilk (optional): you can soak your chicken in buttermilk to help the coating stick more.
- Butter: Salted or unsalted butter is fine.
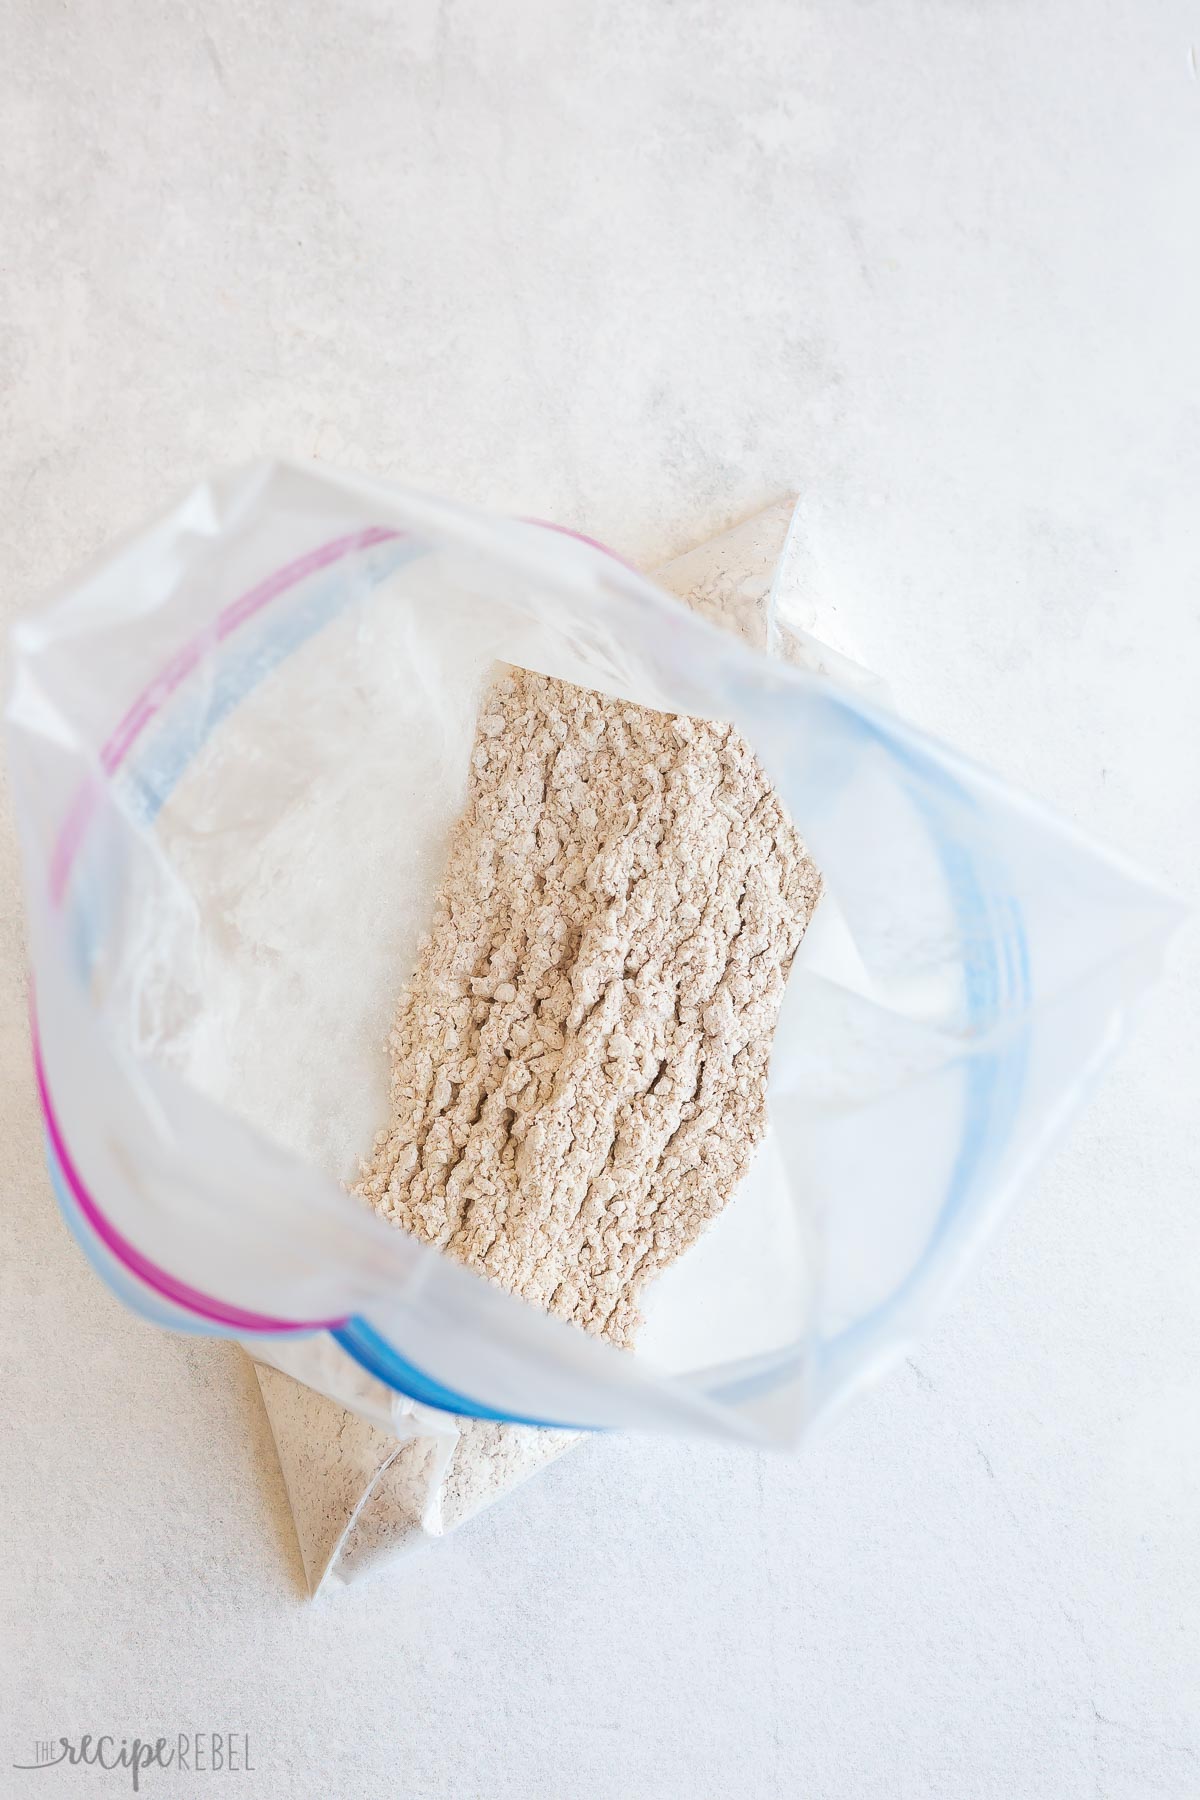
- Flour: All-purpose flour, or you could use gluten-free flour if you prefer.
- Panko: Panko breadcrumbs give the chicken a crunchy, crispy coating. Original or pork rind panko are fine.
- Salt and Pepper
- Seasoned Salt: This versatile seasoning goes with everything! I use Lawry’s brand.
- Paprika: Made from dried, ground peppers, paprika isn’t spicy, but it adds depth of flavor, a slight sweetness, and lots of colour.
How to Make Oven Fried Chicken
Depending on the size and thickness of your chicken pieces, you may need to adjust the cooking time, so always check your chicken for doneness before diving in. The safest way to do this is with a meat thermometer. The chicken should reach 165°F in the thickest part.
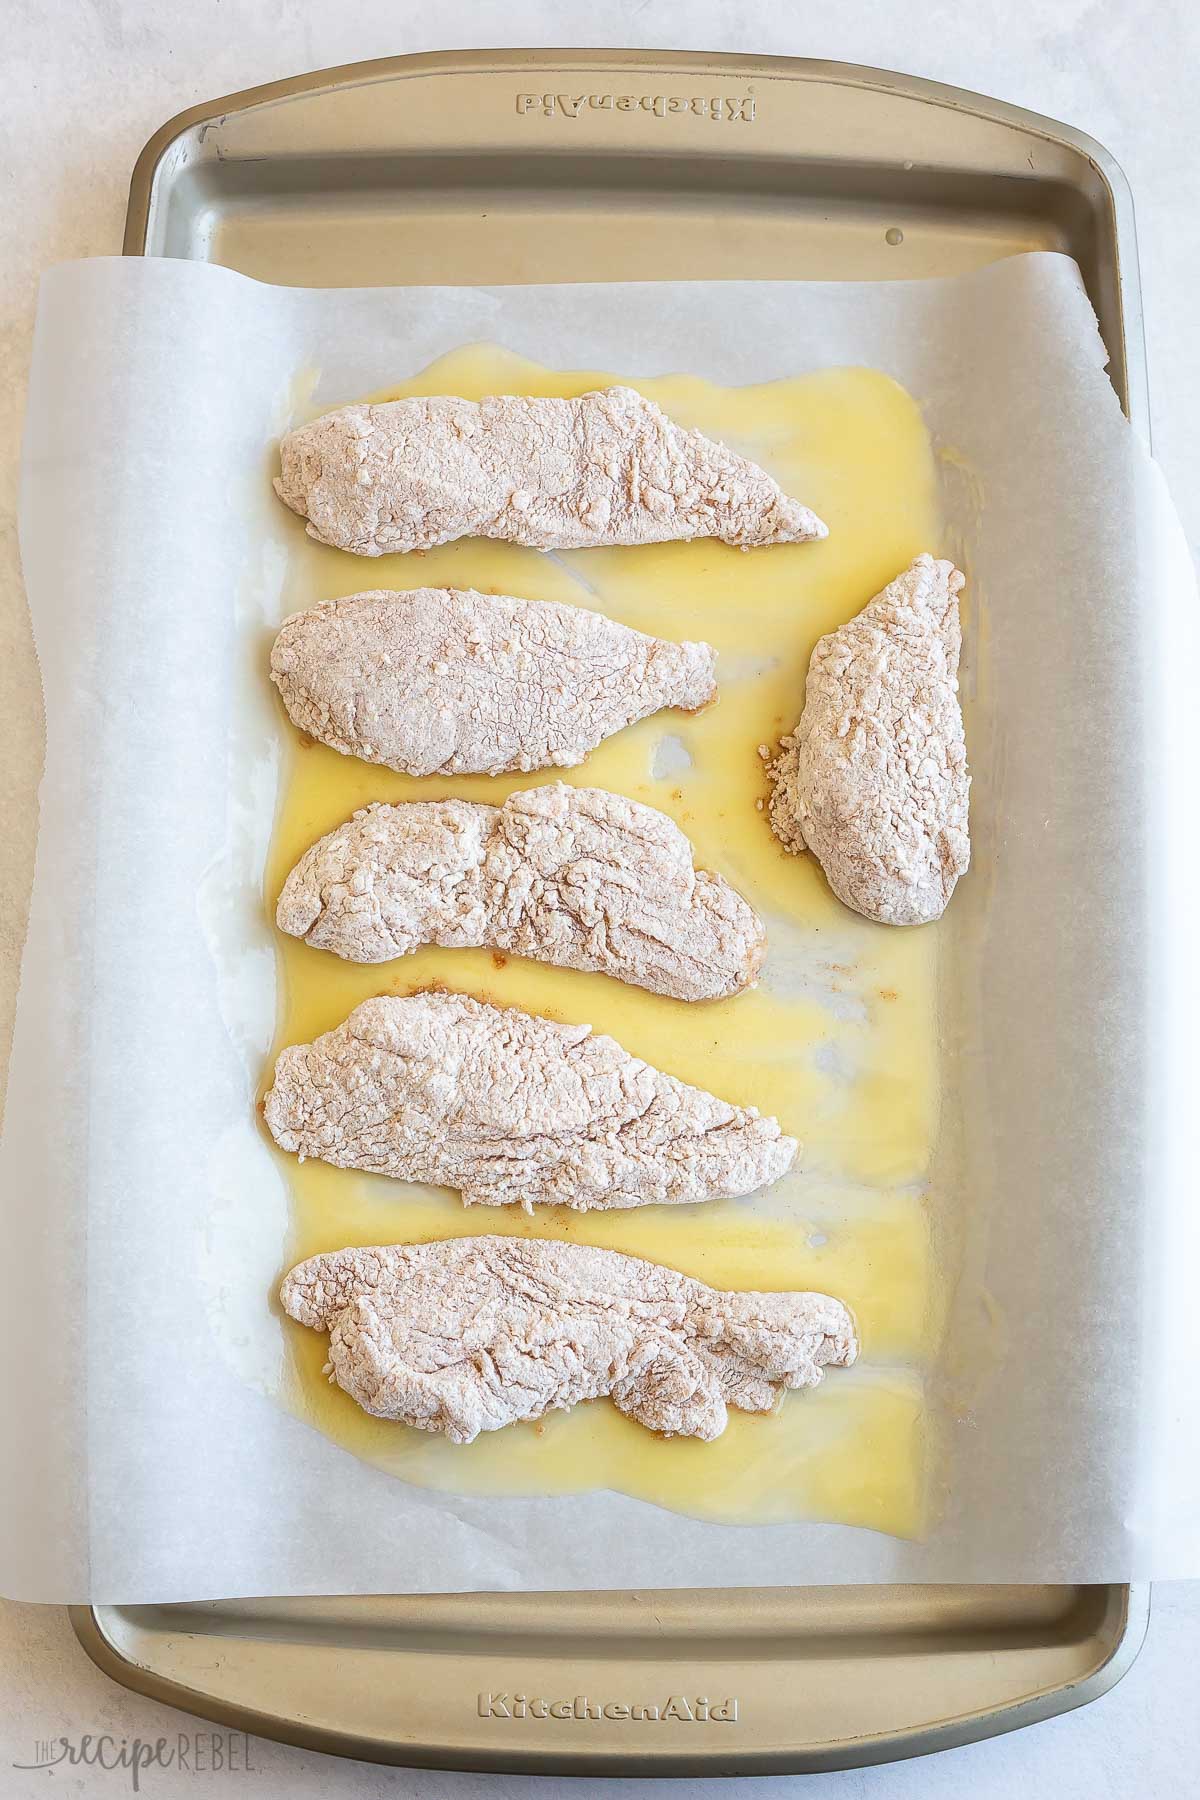
- Get the Oven and Baking Sheet Ready. To get started, preheat your oven to 425°F. Line a large, rimmed baking sheet (10×15) with parchment paper, and brush the butter over the surface of the parchment. It might seem like a lot of butter, but that’s fine. It will help to crisp up the chicken coating!
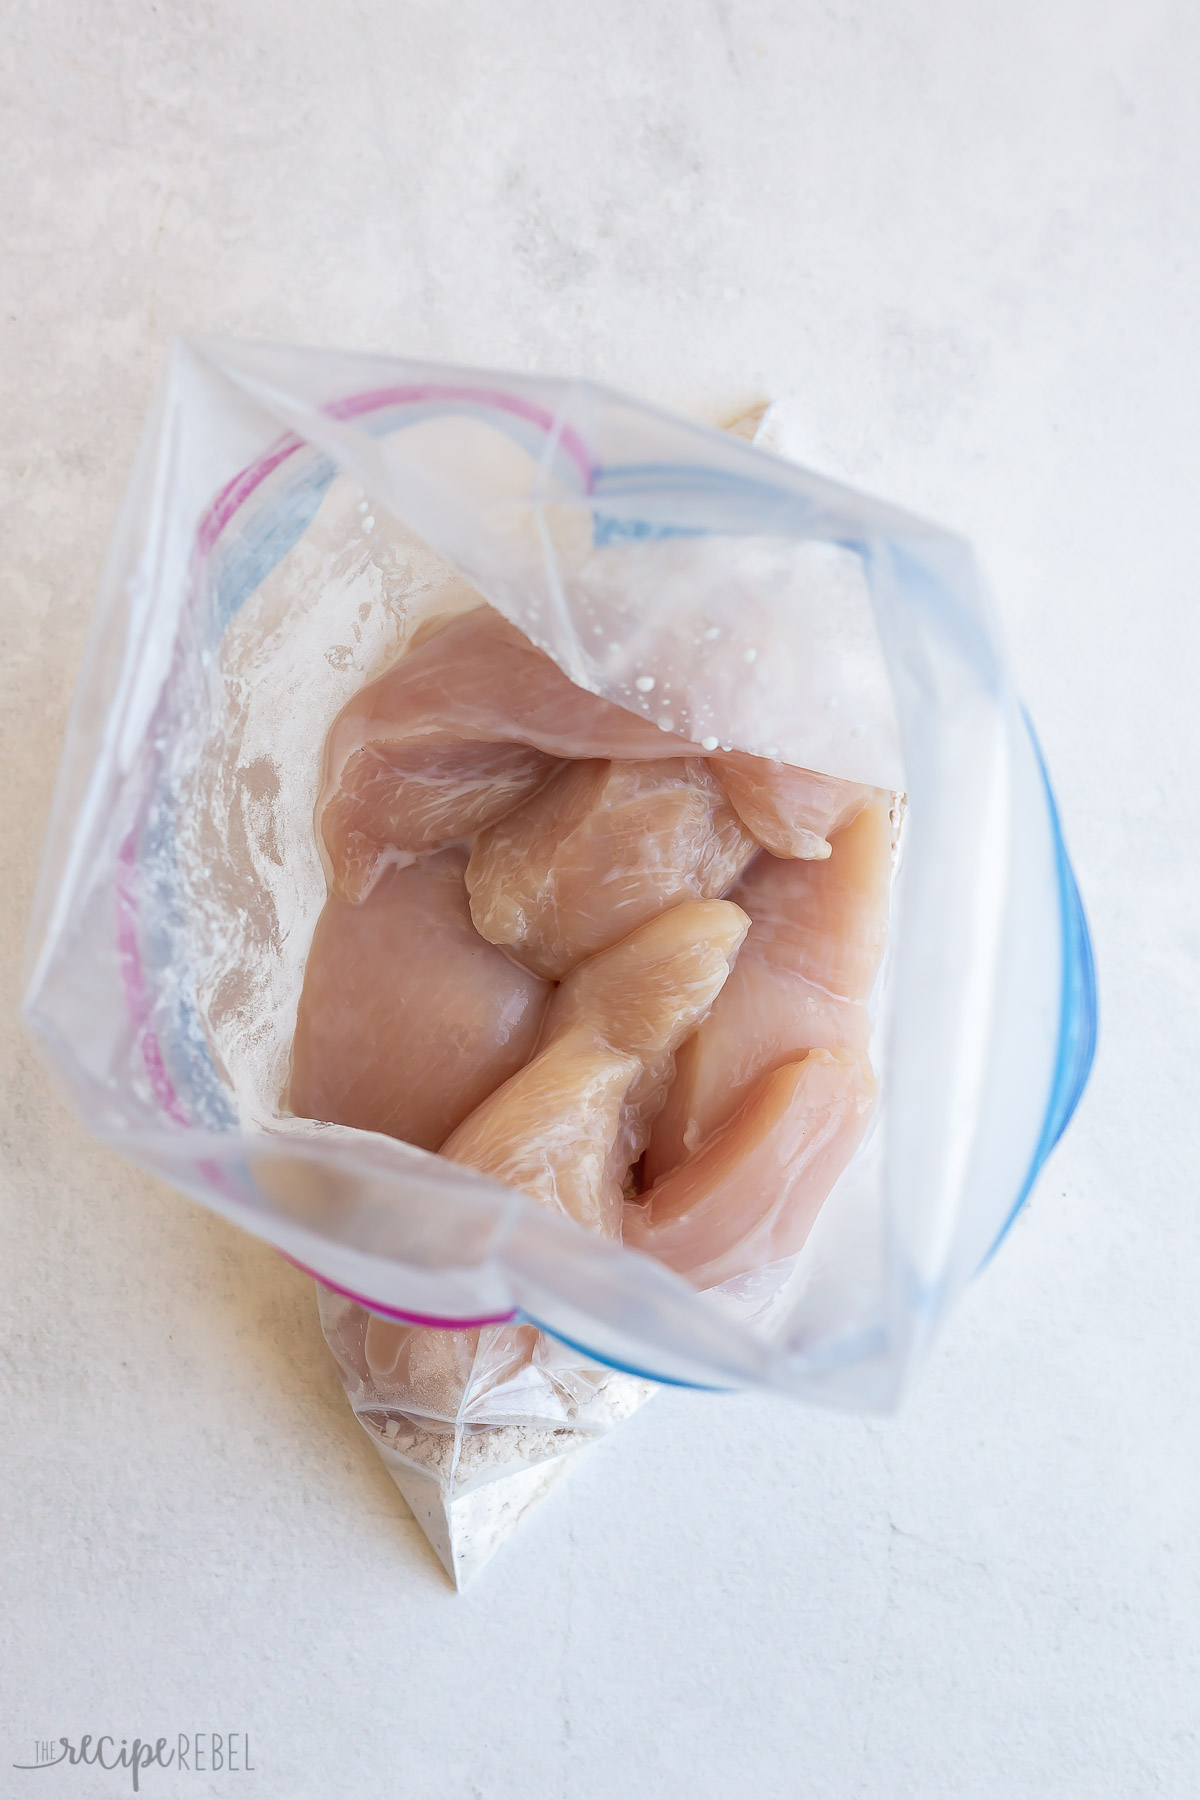
- Bread the Chicken Breast Pieces. Soak the chicken in buttermilk (you can skip this step if you like, but it helps the coating to stick!). Combine the flour, panko, seasoned salt, salt and pepper, and paprika in a large paper or zip-top bag. Add the chicken to the bag, and shake the bag to coat the chicken pieces.
- Bake. Place your chicken on the prepared baking sheet, leaving a space between each strip. Bake the chicken for 10 minutes, flip carefully with a spatula, and bake for another 10 minutes. (Note: if the parchment is dry when you flip the chicken, add a drizzle of oil, to the to ensure the bottom pieces of chicken get crispy.)
- Check for Doneness. Check to make sure your chicken is cooked (165°F), as the thickness can greatly affect baking time. You want it to be done, but not overdone and dry. If it’s not yet up to temperature, bake for another 4-5 minutes at a time, until it’s cooked through
Why is my baked chicken not crispy?
While baking chicken isn’t always known for crispy results, this recipe really does deliver a crispy “fried” main course right out of the oven! Still, I wanted to add some tips that might help, if you find that your chicken is not as crispy as you’d like.
- Use Dark, Non-Stick Pans. Dark pans heat to a higher temperature than light-colored pans, which will help with getting a crispy coating.
- Use Moist Chicken. I keep my chicken breasts in the freezer, and then thaw them in the fridge. So they’re quite moist when it’s time for me to bread them, and a lot of the coating sticks to them easily. If you’re working with fresh chicken breasts, you’ll want to soak them in milk first (or buttermilk, which adds great flavour!).
- Use Butter, Not Cooking Spray. I know you might be tempted to bake the chicken with cooking spray instead of butter, but unfortunately, this just doesn’t work as well. The fat in real butter makes a lot of difference in crisping up the chicken! If you need a healthier substitute, try margarine or reduced calorie margarine.
- Watch the Parchment: When you flip the chicken, you may find that the parchment paper is a little dry. I recommend drizzling more butter or oil onto the parchment to help crisp up the bottom of the chicken as it cooks.
- Serve with Care: As the chicken sits on a plate, the underside may get a little soggy from condensation. Therefore, I recommend serving immediately. If you’re not serving right away, place the chicken on a rack, a plate lined with paper towel, or just keep it warm in a 225°F oven.

Can I make this ahead?
Yes! You can make the breading mixture and bread the chicken pieces, and then “flash freeze” them on a tray in the freezer until frozen solid.
From there, transfer the breaded frozen chicken to freezer bags, and keep for up to 3 months frozen. There’s no need to thaw them before baking, but you will need to add more cook time (around 2 to 5 additional minutes per side, depending on the thickness of the chicken).
Serving Suggestions
When it comes to serving oven-fried chicken breast, I like to go with classic, comforting sides. Here are some of our family favorites:
- Glazed Carrots: These simple Honey Glazed Carrots are made with honey, brown sugar, butter, and garlic. They add a sweet touch to the dinner table, and go perfectly with crispy, well-seasoned chicken.
- Mashed Potatoes: These easy, creamy mashed potatoes come together in the slow cooker, which makes them almost completely hands-off! Try Slow Cooker Mashed Potatoes once, and you may just find yourself making them every week! (Looking for something even more indulgent? Try my Cream Cheese Mashed Potatoes)
- Baked Beans: A beloved potluck favourite, sweet and savory Instant Pot Baked Beans come together quickly, but taste like they simmered all day.
How to Store and Reheat Leftovers
To refrigerate leftover chicken, allow it to cool on a wire rack or paper-towel-lined plate. Then transfer the cooled pieces into shallow, airtight containers. Store in the fridge for 3 to 4 days.
To freeze, place the chicken in a single layer on a tray in the freezer, until frozen solid. Then transfer the frozen pieces to freezer bags, and store in the freezer for up to 3 months.
To reheat oven-fried chicken, place chicken pieces on a wire rack on a baking sheet and place in the oven at 250 degrees just until heated through.

The Best Oven-Fried Chicken
written by Ashley Fehr
Ingredients
- 2 lbs chicken breasts (about 3-4) cut in strips — I get about 3 out of one breast
- 1 cup buttermilk (optional)
- 6 tbsp melted butter
- ¾ cup flour
- ½ cup Panko breadcrumbs
- 1 tbsp seasoning salt I use Lawry’s
- ½ tsp pepper
- 2 tsp paprika
Instructions
- Cut chicken breasts into thick strips and soak in buttermilk.
- Preheat oven to 425°F. Place a large piece of parchment paper on the rimmed baking sheet (10×15) and brush butter over the parchment. It might seem like too much butter, but you need it to crisp up the coating!
- Combine flour, Panko, seasoning salt, paprika and pepper in a large zip-top bag. Add the chicken and shake to coat **
- Place your chicken on the prepared baking sheet, leaving a space between each strip. Bake 10 minutes, flip gently with a spatula, and bake another 10 minutes. (If the pan is dry when you flip the chicken, add a drizzle of oil to ensure the bottom crisps as well)
- Be sure to check to make sure your chicken is cooked (165°F), as the thickness can greatly affect baking time. You want it to be done but not overdone and dry. Bake another 4-5 minutes if needed.
- Remove to a plate lined with paper towel to soak up any excess grease. Serve immediately. To keep warm until serving, place on a wire rack on a baking sheet in a 225°F oven.
Notes
Nutrition Information
Want to save this recipe?
Create an account easily save your favorite content, so you never forget a recipe again.
Tried this recipe?
Tag @thereciperebel or hashtag #thereciperebel — I love to see what you’re making!
Tag @thereciperebel
traci says
I did everything as noted and my chicken looked NOTHING like your chicken! it wasn’t that golden color at all and didn’t have much of a crust? it was flavorful, and moist as we ate it with salad, but looked absolutely nothing like your photos. not sure what happened???
Ashley Fehr says
Hi Traci! I’m so sorry to hear that! Do you think there was enough butter on the pan? It really needs the butter to get golden and crispy. If you used the higher number of chicken breasts then maybe there wasn’t quite enough. Ovens are all different too — maybe it was a bit on the cool side? I’m not sure if this helps!
traci says
Hmmm, I thought I did, as I followed the recipe exactly as written! Such a bummer because your photos look sooooo delicoius! I might try again with more butter in the future. Thanks for your response!
Ashley Fehr says
I hope it works out better for you next time Traci! If when you’re cooking it you notice the pan is looking a little dry, you can always add a little more butter (or even canola oil) to the pan to make sure it browns, and then just keep the temperature nice and high so it doesn’t soak into the chicken. Let me know how it goes!
Patti says
You could try pan-frying your Panko breadcrumbs first in a pan on the stove with 1 TBSP of canola oil, just until browned, then let cool before mixing with the rest of your ingredients. This makes them the light brown color. Just be sure to watch them closely and keep stirring. It doesn’t take too long, maybe 3-4 min? Good luck. 🙂
Stacey says
Ok, so it tasted really good!!! My house stinks like burnt butter but the end result was delicious.
Ashley Fehr says
I’m glad to hear it was good! I’ve never had the burnt butter problem before but I always take the pan out of the oven once the butter is melted before adding the chicken — was that maybe the problem?
Stacey says
I followed this recipe exactly and all it did was turn my smoke detectors on 🙁 I’m cooking it right now and we’ll….. It looks gross. My whole house smells like burnt butter and as stated, I followed your instructions exactly. I doubt this is going to taste good and I’m disappointed.
Ashley Fehr says
Sorry — I got your second comment first! I can’t say I’ve ever had that problem. You should remove the pan with the butter when it is melted before adding the chicken, but that’s the only thing I can think of that would make the butter burn.
Helen says
At 425 degrees, your oven has to be pretty clean as well, or you may set off smoke alarms.
Angela says
Hi Ashley! I have to say I love how responsive you are with your comments! I’m going to try this recipe this week & I’m wondering if maybe you have a suggested ratio for the amount of butter to use relative to the amount of chicken? The chicken breasts I buy come in a package of 6 individually packaged breasts, about 4oz each, so I’m guessing that may be smaller than what you use based on your photos. I don’t want soggy chicken & it seems that’s mostly dependent on the butter, so I’d appreciate some help! 🙂
Ashley Fehr says
Hi Angela! There have been people who ended up with soggy chicken, but I never have. I wouldn’t reduce the amount of butter for the amount of chicken you’ve mentioned because without the butter, the flour just stays flour — there’s nothing to crisp it up! I even tried with non-stick spray before and it didn’t work. You really just want an even coating of melted butter on the pan, enough so that when you flip the chicken there is enough to crisp up the other side as well. I hope that helps!
Kahla says
Hi I want to try this tonight and I am wondering if I could use foil on the baking sheet?
Ashley Fehr says
You can try! I never have, and I’m not sure if you’d get the same crispiness or not with the foil. If you try it, I’d love to hear if it worked out for you!
Ann says
My husband, Ken, loves your recipe for “The Best Oven Fried Chicken.” He says it tastes exactly like KFC. He’s hard to please, so thanks for the recipe!!
Ashley Fehr says
Thanks Ann! I’m so glad to hear you guys liked it! It’s one of our favorites too 🙂
Ann says
Now Ken says this is the best chicken I cooked in 22 years…wow!! I’m going to bake your Oatmeal Peanut Butter Chocolate Chip Cookies for dessert….no raisins this time, sorry Ken. I’m so happy to have found your site. Thanks again, Ashley!!
Ashley Fehr says
Wow! That is a pretty big compliment! I hope you found me here, too Ann — and I hope you love the cookies as much as we do!
Amanda says
Can I use this recipe on tenders and not breast? I’m asking because when I do chicken tenders I do about 20 of them and not sure if I should double the recipe or not.
Ashley Fehr says
You definitely can! If you’re doing 20 tenders, I would probably double the flour mixture just to be safe, or at least do 1.5 times the recipe.
Beth says
Am I the only one whose butter burned in the oven while preheating???
Ashley Fehr says
I’ve never had that happen Beth — sorry!
Kathleen says
I made this tonight using chicken legs. I opted for the flour/egg/flour method. It was PERFECT!!! Not soggy at all. I took pictures to post with this comment, but I don’t know how to attach them. This is now my favorite “fried” chicken recipe. Thank you!!!!!
Ashley Fehr says
Thanks Kathleen! I don’t think there’s any way to attach photos to comments, which is too bad! I would love for you to share them on social media (Facebook, Instagram or Twitter) if you’re on so I can see! Thank you so much for coming and leaving a comment!
Barbara says
I tried this recipe using the experiment using the coat in flour mixture, dip in egg, coat in flour. The chicken is absolutely moist and delicious. I like that I can put it in the oven with some scalloped potatoes and it all gets done about the same time. I will next try the 1/2 panko & 1/2 flour.
Ashley Fehr says
I’m glad you liked it Barbara! Let me know which way you like better!
Grace says
A new family favorite! Thank you so much for the recpe.
Robin Straley says
Could a black iron skillet work too?
Ashley Fehr says
Yes a cast iron skillet would work great!
GiGi Eats says
Mmmm! I have done this with coconut flour with great success! 😀
Lindsay says
I made this dish tonight, and while it did come out a bit crispy, the coating was very thin, and didn’t really resemble “fried” chicken. Perhaps it needs to be double dipped in egg and the flour mix.
Ashley Fehr says
I’ve tried it all and this is the way we prefer it! You can see all of the tests I did on different methods (including using egg) on the Great Oven-Fried Chicken Experiment post 🙂
Ashley says
These look good. I might try these soon.
Ashley says
Great! Let me know how you like it 🙂
Adam C says
Hi Ashley. I am impressed by how attentive you are to your comments.
I cooked this tonight and while the flavor is great, I did not get any crispiness. I think maybe part of my problem is that I cut each chicken breast into 5 pieces instead of 3, and so maybe it cooked too quickly? I coated each piece individually, but I found it odd that there was no egg used to help the batter stick.
Any tips on how to make this better next time?
Ashley says
Hi Adam! I’m glad you gave it a try. Have you looked through my notes above the recipe and the Great Oven-Fried Chicken Experiment that I did where I tested a few different methods? I did experiment with soaking the chicken beforehand and didn’t find that it made a difference because I start with frozen chicken breasts. When they thaw, they are moist so I’ve never needed to do anything to make the coating stick. If you check out my other post on alternate methods and don’t see anything that might help, let me know! One thing I tried that I liked it subbing half the flour for Panko bread crumbs — it did get a little extra crunchy!
Brittany Green says
I think people probably have the issue with sogginess if they use too much butter, the first time I tried the recipe I used more but as long as there is enough butter to coat a little more than the bottom but not just sitting there it turns out great. This is def a family fav. and I’ve passed the recipe onto many friends and family members!
Ashley says
That’s a good point! It’s definitely important to have enough butter to brown the chicken, but too much could definitely be a problem. A few tbsp is really all that’s needed.
Rox says
Can I use olive oil or coconut oil in place of butter?
Ashley says
I’m not sure as I have never used either as a substitute. I’m not sure what they do at high oven temperatures. If you try it be sure to let me know!
Lauri M says
I use 1/2 butter and half Crisco oil. Turns out great!
naila says
I”ve made this chicken more times now than i can count. to call it a slight addiction would be an understatement. the two pickiest children in the universe devour it too..and it’s SO easy..thank you!
Ashley says
That’s awesome Naila! I’m so glad to hear it!
Emily Flippin Maruna says
We are a dairy-free family so I soaked the chicken in organic coconut milk (canned) before I mixed it with the seasonings. I also added 1/2 cup of Italian seasoned Panko. Yum! My whole family liked it. Thanks!
Ashley says
The coconut milk is a great idea! Thanks Emily!