
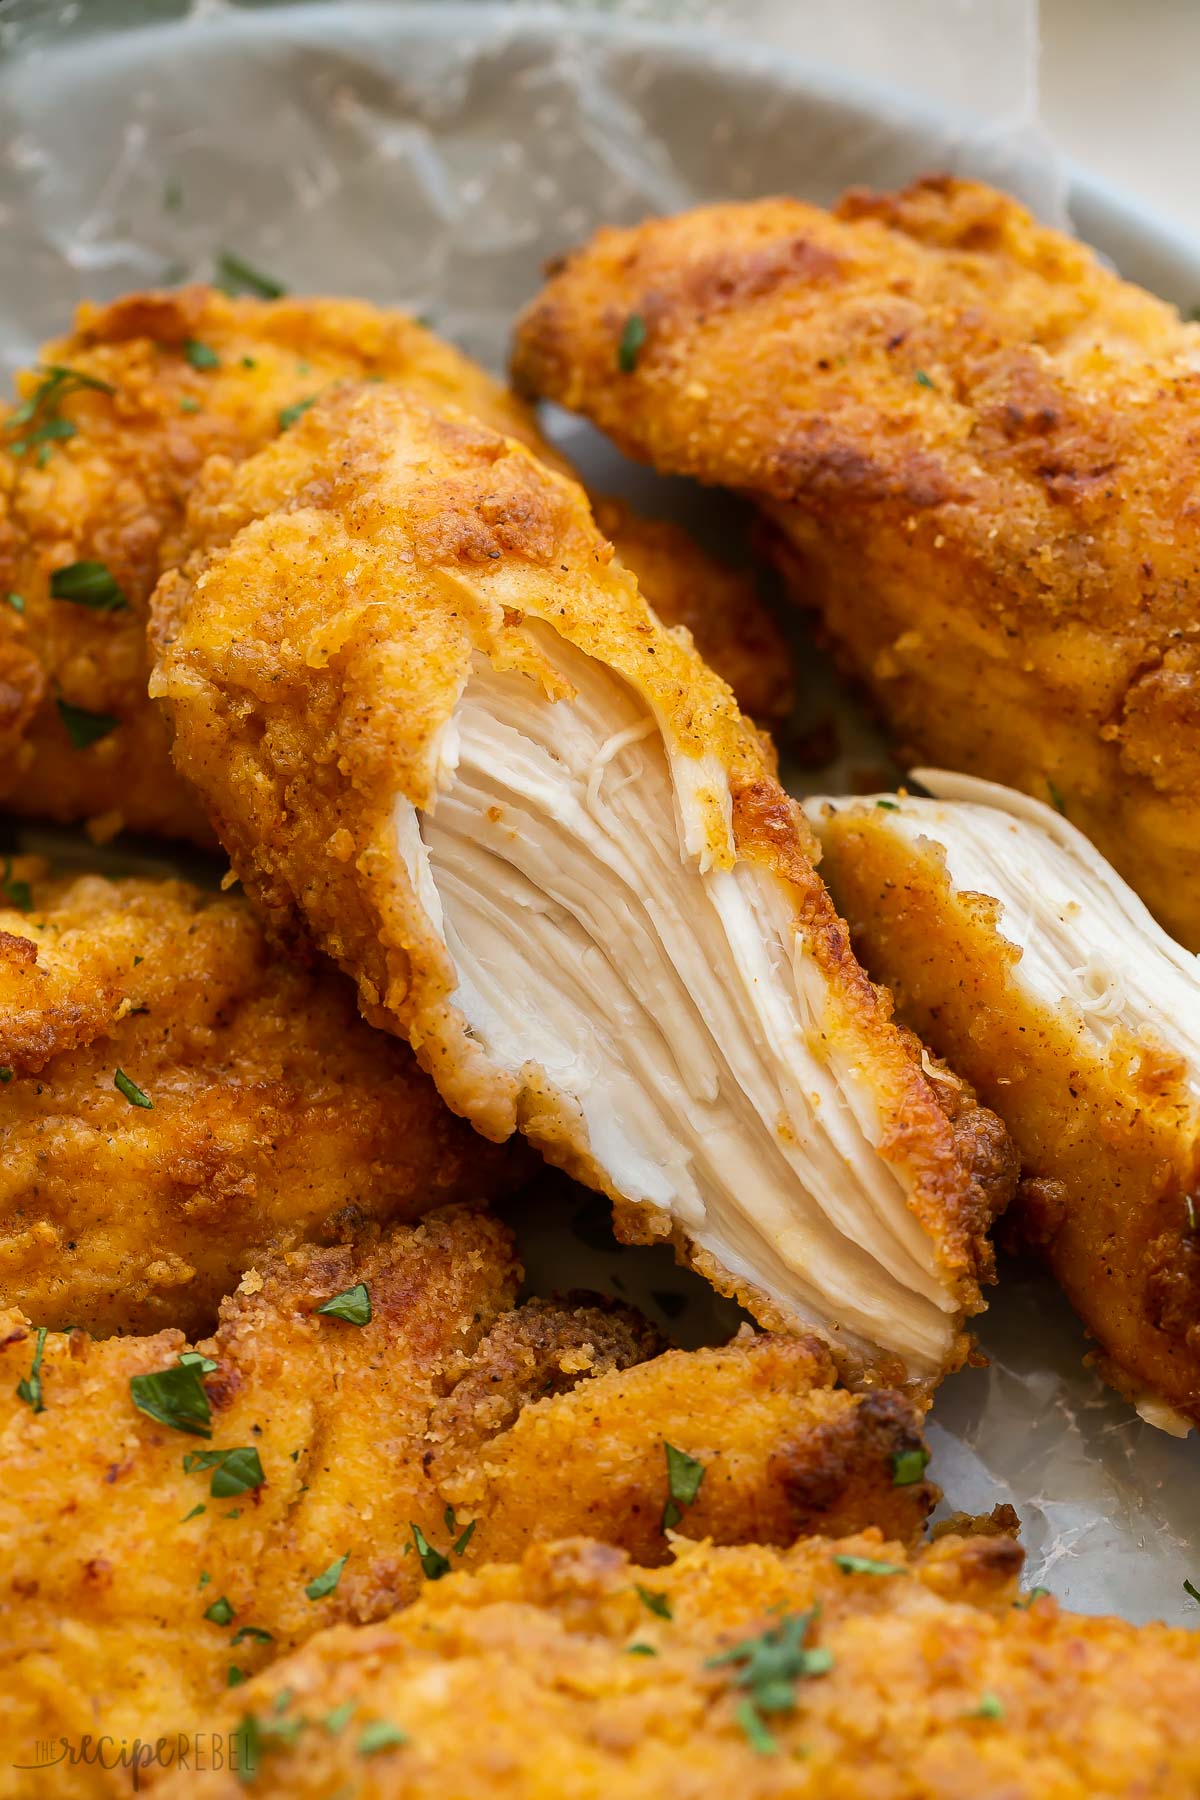
This easy Oven-Fried Chicken turns out perfectly crispy and juicy every time! The special seasoning blend tastes just like KFC, but it’s made with wholesome ingredients in your own kitchen. No deep fryer needed!

Can’t get enough crispy chicken recipes? Try this Crispy Chicken with Basil Cream Sauce, Parmesan Crusted Chicken, or Air Fryer Fried Chicken!
Table of Contents
- Why you’ll love this crispy Oven-Fried Chicken:
- What people are saying:
- Oven-Fried Chicken ingredients:
- How to make fried chicken in the oven:
- Quick things to remember:
- How to store leftover chicken:
- Why is my baked fried chicken not crispy?
- Make-ahead option:
- Serving Suggestions:
- More baked chicken recipes:
- The Best Oven-Fried Chicken Recipe
If you’re craving traditional fried chicken but don’t feel like going out, this Oven-Fried Chicken will hit the spot!
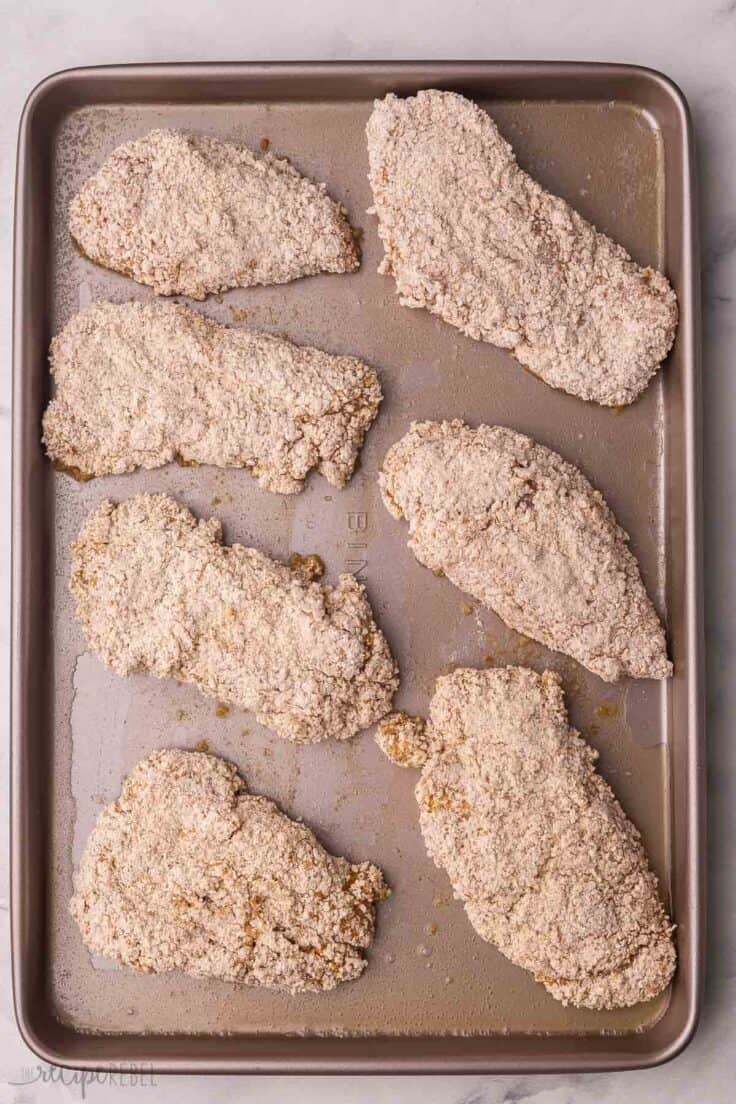
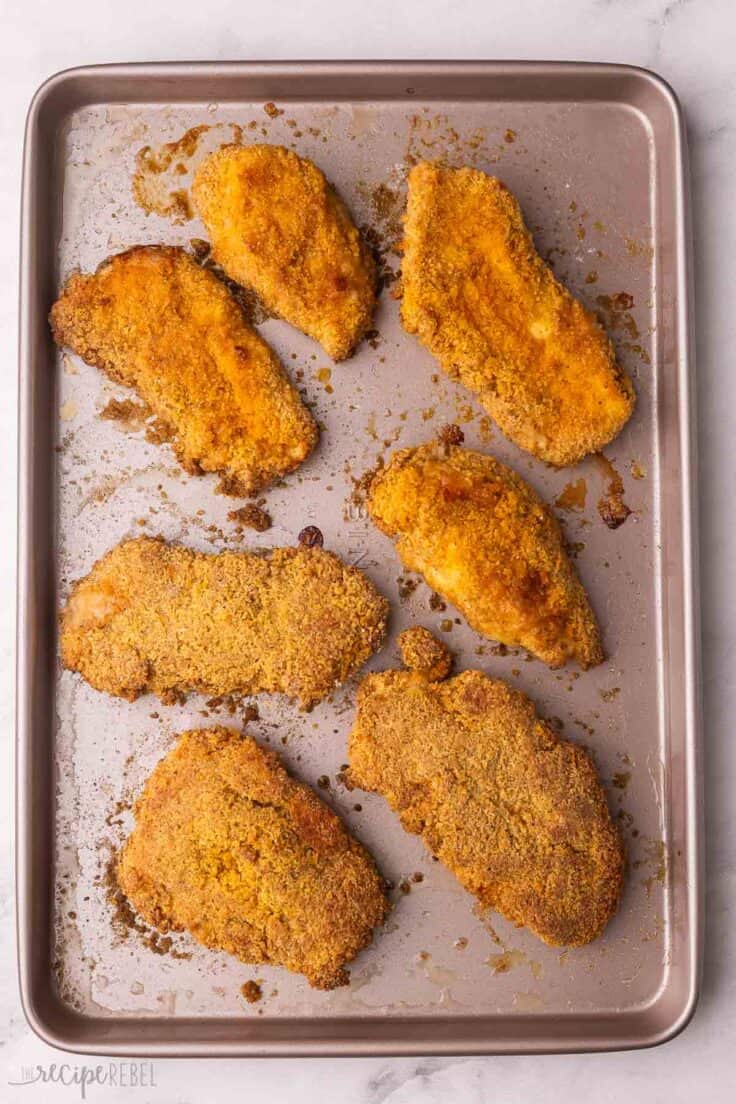
Instead of deep frying, this recipe coats chicken strips in eggs and a panko bread crumb mixture for a crispy coating. They’re baked on a sheet pan with butter to get that signature crunch.
It has all that big flavor of KFC fried chicken, but with less fat.
This is a dinner recipe that our whole family loves, especially the kids! Serve it up with Spicy Mayo, Sweet and Sour Sauce, or Homemade BBQ Sauce and watch it disappear fast.
Why you’ll love this crispy Oven-Fried Chicken:
- Better than takeout: because we’re making it at home, we know what’s going into it.
- Wonderfully crispy: You get all the crunch of fried chicken but baked in the oven! No deep frying required.
- Quick and easy: All you need are a handful of simple ingredients and basic prep, and it’s ready in no time for an easy weeknight dinner.
What people are saying:
![]()
“WoW – Absoltely FanTAStic!!! A random search on Google led me to your site and after seeing the huge numbers of high ratings, decided to give it a shot. SO GLAD I did – crispy yet juicy and spot on flavor. With a real feel of -22 in ND, this was Exactly what I needed. Highlight of my weekend 😁” Gabriella
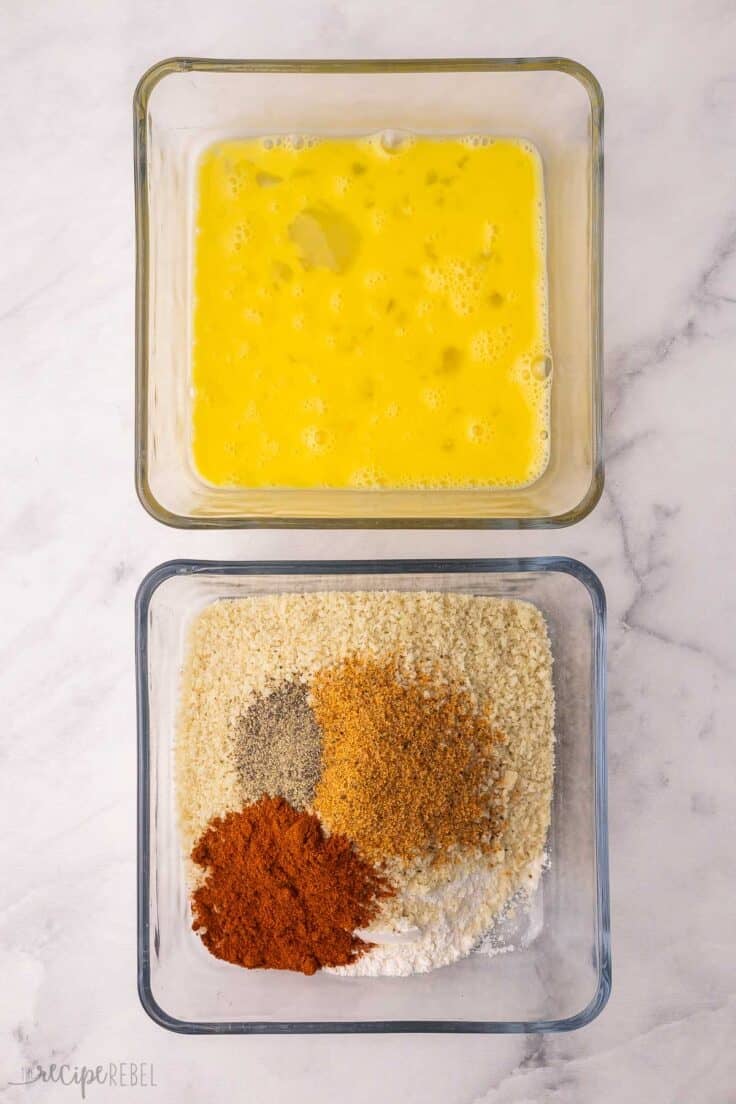
Oven-Fried Chicken ingredients:

- Chicken breast: One batch of this recipe makes about 3-4 chicken breasts, or around one and a half pounds, cut into strips. One chicken breast equals about three strips, the way I cut them. You could also use tenders, thighs, or legs!
- Eggs: Coat your chicken with beaten eggs to help the coating stick more.
- Butter: Salted or unsalted butter is fine.
- Flour: All-purpose flour helps coat the chicken to produce a crispy exterior! You can swap with gluten-free flour if needed.
- Panko: Panko breadcrumbs give the chicken a crunchy, crispy coating. For a gluten-free option, you can use pork rind panko!
- Seasoned salt: This versatile seasoning goes with everything! I use Lawry’s brand, but feel free to use your favorite brand.
- Paprika: It isn’t spicy, but it adds depth of flavor, a slight sweetness, and lots of color. You could add a dash of cayenne pepper to make it spicier if you like!
How to make fried chicken in the oven:
This recipe is the best way to enjoy fried chicken at home! For the full list of recipe instructions, scroll down to the recipe card below.
- Whisk the eggs in a shallow dish. Mix the coating by combining bread crumbs, flour, and seasonings in another shallow dish.
- Coat the chicken by dipping each piece in the egg, then pressing it into the breadcrumb mixture. Bake the chicken until it’s golden brown and crispy.
Quick things to remember:
- Cooking time: Depending on the size and thickness of your chicken pieces, you may need to adjust the cooking time, so always check your chicken for doneness before diving in.
- Add oil: If the pan is dry when you flip the chicken, add a drizzle of oil, to the to ensure the bottom pieces of chicken get crispy.
How to store leftover chicken:
To refrigerate leftover chicken, allow it to cool on a wire rack or paper-towel-lined plate. Then transfer the cooled pieces into shallow, airtight containers. Store in the fridge for 3 to 4 days.
To freeze, place the chicken in a single layer on a tray in the freezer until frozen solid. Then, transfer the frozen pieces to freezer bags and store them in the freezer for up to 3 months.
To reheat Oven-Fried chicken, place chicken pieces on a wire rack on a baking sheet and place in the oven at 250 degrees just until heated through.

Why is my baked fried chicken not crispy?
While baking chicken isn’t always known for crispy results, this recipe really does deliver a crispy “fried” main course right out of the oven! Still, I wanted to add some tips that might help if you find that your chicken is not as crispy as you’d like.
- Use Dark, Non-Stick Pans. Dark pans heat to a higher temperature than light-colored pans, which will help with getting a crispy coating. Make sure the pan and butter are hot when you add the chicken.
- Use Butter, Not Cooking Spray. I know you might be tempted to bake the chicken with cooking spray instead of butter, but unfortunately, this just doesn’t work as well. The fat in real butter makes a lot of difference in crisping up the chicken! If you want, you can spray the other side of the chicken when you flip for extra insurance.
- Check when you flip: When you flip the chicken, you may find that the pan is a little dry. You can add more butter or oil to the pan to help crisp up the bottom of the chicken as it cooks.
- Serve with Care: As the chicken sits on a plate, the underside may get a little soggy from condensation. Therefore, I recommend serving immediately. If you’re not serving right away, place the chicken on a rack or a plate lined with a paper towel, or just keep it warm in a 225°F oven.
Make-ahead option:
You can make the breading mixture and bread the chicken pieces, and then “flash freeze” them on a tray in the freezer until frozen solid.
From there, transfer the breaded frozen chicken to freezer bags, and keep for up to 3 months frozen. There’s no need to thaw them before baking, but you will need to add more cooking time (around 2 to 5 additional minutes per side, depending on the thickness of the chicken).
Serving Suggestions:
When it comes to serving Oven-Fried Chicken, I like to go with classic, comforting sides, like baked beans and slow cooker mashed potatoes! If you want to add some veggies, you can’t go wrong with some glazed carrots.
Every once in a while, I like to go for something more indulgent and make my cream cheese mashed potatoes!
More baked chicken recipes:
- Baked Chicken Wings — perfect for a party!
- Baked Chicken Breast — SO juicy.
- Baked Chicken Thighs — perfectly crisp skin.
- Baked Chicken Drumsticks — the kids love these!
The Best Oven-Fried Chicken
written by Ashley Fehr

Ingredients
- 2 eggs
- 1 cup panko bread crumbs
- ¾ cup all-purpose flour
- 1 tablespoon seasoning salt
- 2 teaspoons paprika
- ½ teaspoon pepper
- 2 pounds boneless skinless chicken breasts, , cut into strips (about 3 or 4 breasts)
- ¼ cup unsalted butter, plus more if needed
Instructions
- Preheat the oven to 425°F.
- In a shallow dish, whisk the eggs.
- In a second shallow dish, combine the bread crumbs, flour, seasoning salt, paprika, and pepper.
- Coat each piece of chicken in the egg, then in the bread crumb mixture, pressing on firmly to adhere. Place the chicken on a plate and repeat until all the chicken is coated.
- To a rimmed baking sheet, add the butter and put the pan in the oven to melt the butter. (You want the pan to get hot, but be careful not to burn the butter.)
- Place each piece of chicken on the hot pan, leaving a good amount of space in between. Bake for 20 minutes, flipping gently halfway through, or until cooked through and a meat thermometer inserted into the chicken reaches at least 165°F and the coating is browned. If necessary, add another dab of butter when flipping.
- Remove from pan and serve immediately.
Video
Notes
Nutrition
Nutrition information is automatically calculated, so should only be used as an approximation.
Want to save this recipe?
Create an account easily save your favorite content, so you never forget a recipe again.
Tried this recipe?
Tag @thereciperebel or hashtag #thereciperebel — I love to see what you’re making!
Tag @thereciperebel
Catherine Mutter says
I didn’t have seasoning salt so I used buttermilk ranch seasoning and it was amazing!
Ashley says
That’s an interesting twist! Good to hear — thanks!
Aaliyah says
I’m trying the recipe with chicken quarters, will I have to do anything differently while cooking?
Ashley says
With bone-in chicken you’ll likely have to increase baking time. Just be sure to check with a thermometer for doneness!
Craig Hood says
All week long I’ve been telling my wife I’m going to make fried chicken, mashed potatoes, and biscuits for dinner one night. Once I found your recipe, I knew it was time. I made your chicken tonight and it was delicious. I did follow one of your alternative recipes: I added panko to the flour mix for extra crispness. This is a keeper. I’m sharing the recipe with everyone who will listen.
Ashley says
I am so glad you liked it! It is the best oven version we’ve tried. The Panko is awesome, too! Thanks Craig 🙂
Cindy says
These are SO easy and they turned out perfectly! They had great flavor and we had no problem getting the breading to stick.
Ashley says
I’m glad!
Julie says
I honestly was browsing the web for easy quick chicken recipes and followed your seasonings/time without putting too much thought into it and they came out perfectly! I did let them sit in the oven an extra minute or so after the last turn while I was getting something else ready to prolong the crispness. Thanks!
Ashley says
That is awesome Julie! Thanks so much for coming back to leave a comment!
Jessica says
We just tried this recipe tonight! Although it was yummy, we didn’t have much of a “breading” on it. It was kinda of all washed off when we flipped it. I don’t think we had too much butter either. I’m thinking we may need to use an egg wash or something to help thicken the crust. Any ideas? My food didn’t look anything like yours. =( I’ll be trying it again but I’m going to try more of a coating!
Ashley says
That’s strange Jessica. Sometimes food won’t release from a pan if the pan isn’t hot enough or wasn’t completely browned, so you could try increasing the temperature a bit or leaving it another minute or so. Do you think there was enough butter on the pan? I know some people have had luck with non-stick spray, but I find it doesn’t work for me, and unless there’s a good amount of butter I can’t get it to brown and it starts sticking. Was your chicken pretty moist before breading? I use thawed frozen chicken breasts, so I never need to soak the chicken first but it might be worth a shot if your chicken is pretty dry on the outside. I hope that helps! This is one of our favorites 🙂
Ann says
Bravo!! There were delicious I was missing a slight crunch like fried chicken but my goodness were these good I had no problems with the coating not sticking and I used chicken tenderloins and it worked perfect!! My one year old loved them too! Thanks for the delicious recipe!
Ashley says
Thank you! So glad you (and your one year old!) enjoyed them!
Samantha says
Made this exactly by the recipe-also using dark, non-stick pan- and still turned out soggy :/ loved the flavor though.
Ashley says
I’m so sorry it didn’t work for you! Glad you liked the flavor! If you can tell me more about how you made it maybe we can figure out some improvements.
Arie D. says
I have made this twice now, I have changed it up a bit on my second. I added twice the amount of paprika and seasoned salt, added a bit of cayenne as well. I also cooked it 15 min on each side. It perfect! The key for crispness is to let it cool off a bit. Thanks
Ashley says
You must like things with a bit of heat! I think we prefer ours a little milder. I’m glad you found a way that you enjoy! Thanks for the comment!
Lael says
To prevent the chicken from getting soggy if you have to wait to plate it is to let it cool on a rack. The air can circulate and not get soggy.
Ashley says
That’s a great tip!
Becky Jepsen says
Do you think ground pork rinds would work instead of flour?
Ashley says
I really can’t say — I don’t think I’ve ever even purchased them! If you decide to try it, let me know how it turns out!
A. Tomlin says
I “fried” a whole cut up chicken. I melted a stick and 1/2 of butter in large baking pan. I then left space between pieces. Cooked 20 minutes and flipped and cooked another 20 flipped again for 5. It did turn out crispy. I seasoned the chicken with paprika, cayenne, garlic powder, pepper and salt and let sit a bit, I then seasoned flour. My family loved it. I used regular salted butter, but of course light butter would work too. I will be using this method again. Less messy and smelly in kitchen is always a plus. 🙂
Ashley says
Great! Glad it turned out for you!
Kim says
I’m trying this tonight!! I’ll re-post when the the chicken is done. 🙂
Ashley says
I’d be glad to hear how it turns out!
Debbie says
Hi, I made the oven fried chicken last night. I followed the recipie exactly. I did not have a crispy chicken, I had soggy chicken pieces, some still had flour on them even after turning them over halfway through. I see other people had much better results. I’ve looked this over and over and did everything correct. Just don’t understand why mine didn’t turn out! I could taste the flour every time I took a bite. Any suggestions? Thank you!
Ashley says
I would recommend more butter on the pan. You really need the butter to crisp up the coating. I’ve tried with non-stick and my chicken is still floury. If you had quite a bit of chicken on the pan there just might not have been enough butter to brown all the pieces, or if you used the smaller amount of butter. If you notice when you’re cooking them that the butter is all used up and the chicken isn’t browning, I’d add another couple tbsp to the pan as you’re cooking. Hope that helps!
Lea says
I made this chicken last night and I just HAD to comment. I was very skeptical about the outcome since it’s oven “fried” chicken and other oven fried chicken recipes i’ve tried always turned out very soggy and gummy. Let.me.tell.you. I was SO impressed with this chicken!! It blew my mind. It was crispy and had great seasoning! I think the key is to make sure you space out the chicken. I used a cast iron skillet and 2 dark pans to cook 4 breast. So good! Thank you!
Ashley says
That’s awesome! Great tip on leaving space between — that’s super important! So glad you liked it 🙂
sasha says
Hi there! Great recipe! I was just wondering if there are any spices you would recommend instead of paprika? I just ran out tonight and am trying to use other spices I have round the house.
Thanks very much!
Ashley says
Hi Sasha! Thanks! That’s a tricky one, because there is so much paprika. You could try adding some cayenne, but cayenne is hotter so just be careful with it (unless you like things really spicy!). You could try a bit of cayenne and a bit of chili powder or cumin, but the chili powder and cumin will change the flavor significantly. I hope that helps! You could also try increasing the seasoning salt a bit and adding maybe 1/2 – 1 tsp cayenne.
Barb says
I followed the recipe to the T, and they were soggy! I had to put them in the broiler to try and crisp them up! The flavor was good but definitely NOT CRISPY! Don’t think I will make these again!!
Ashley says
There are lots of reasons this can happen. Oven thermometers are not always accurate — I would make sure that you check your oven temperature with an external thermometer and use a dark, heavy pan. I’d also make sure that your oven is completely preheated before putting it in the oven. I would also make sure there’s not excess moisture in the chicken: if it’s not 100% thawed, or if you’ve soaked it in milk, it could have excess moisture that’s seeping out. I hope that helps!
Autumn says
I had never made fried chicken before. I saw this on Pinterest, and after looking at the recipe, I knew this would be an easy recipe for me to make. I’m all for recipes with 5 ingredients or less and very few directions (shows me it’s easy!). It turned out really delicious. I ended up cooking it on a lower temperature for a bit longer because I was baking macaroni and cheese at the same time, but it turned out really yummy. My husband felt it tasted more like Long John Silver’s chicken with the batter taste, but regardless, this will be a must-have dish in our home that’s cheap and yummy!
Ashley says
Thanks Autumn! I’m glad to hear it!
Emilee says
Will this recipe work with Chicken Legs?
Ashley says
I’m sure it would, yes, but you’ll have to bake longer probably. Just check with a meat thermometer.
chellsea says
I’m going g to sound dumb but the butter you had as an ingrediant, is that for on the pan or out in the mixture with extra butter on the pan?
Ashley says
The butter goes in the pan before you put the chicken in! No problem 🙂
Maria says
Made this yesterday and it turned out perfectly! Not soggy at all. Thanks!
Ashley says
I’m so glad!
Mindy says
I tried this tonight and was very disappointed. Absolutely no crisp, not much browning either, I even turned the broiler on hoping that would help before burning the entire pan. I honestly don’t know what I did wrong, I used a dark non-stick pan. Your picture looked amazing and I’m a little discouraged to try it again.
Ashley says
Did you have a good amount of butter on the pan to start? You really need the butter and a high temperature to brown the chicken. I would even recommend checking your oven temperature with a thermometer as the oven thermostat can be pretty unreliable. The only trouble I’ve had getting the coating to brown was when I tried it with non-stick spray. I don’t really like using the broiler because it can dry out the chicken. Any other recommendations I could make are listed in the update from February above and on the experiment page. I hope that helps!