
This easy Oven-Fried Chicken turns out perfectly crispy and juicy every time! The special seasoning blend tastes just like KFC, but it’s made with wholesome ingredients in your own kitchen. No deep fryer needed!

Can’t get enough crispy chicken recipes? Try this Crispy Chicken with Basil Cream Sauce, Parmesan Crusted Chicken, or Air Fryer Fried Chicken!
Table of Contents
- Why you’ll love this crispy Oven-Fried Chicken:
- What people are saying:
- Oven-Fried Chicken ingredients:
- How to make fried chicken in the oven:
- Quick things to remember:
- How to store leftover chicken:
- Why is my baked fried chicken not crispy?
- Make-ahead option:
- Serving Suggestions:
- More baked chicken recipes:
- The Best Oven-Fried Chicken Recipe
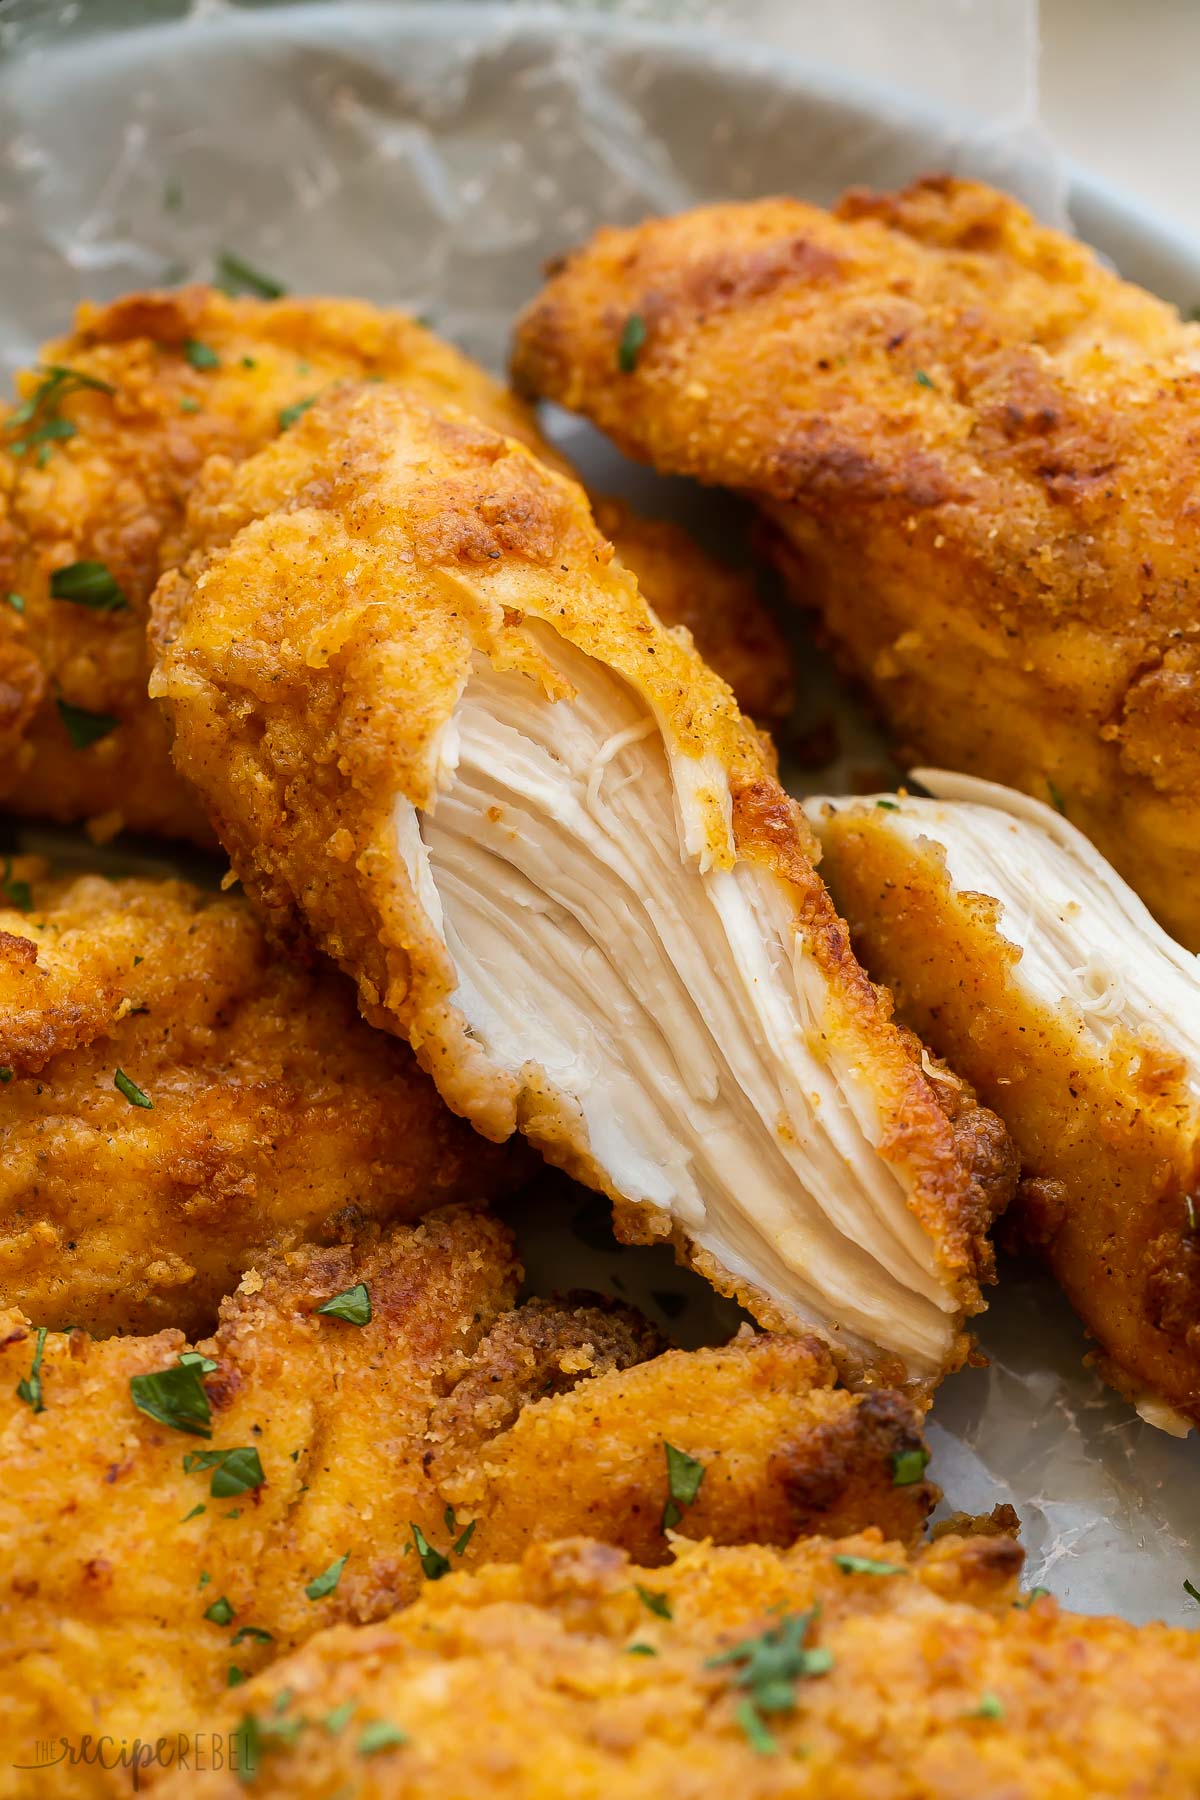
If you’re craving traditional fried chicken but don’t feel like going out, this Oven-Fried Chicken will hit the spot!
Instead of deep frying, this recipe coats chicken strips in eggs and a panko bread crumb mixture for a crispy coating. They’re baked on a sheet pan with butter to get that signature crunch.
It has all that big flavor of KFC fried chicken, but with less fat.
This is a dinner recipe that our whole family loves, especially the kids! Serve it up with Spicy Mayo, Sweet and Sour Sauce, or Homemade BBQ Sauce and watch it disappear fast.
Why you’ll love this crispy Oven-Fried Chicken:
- Better than takeout: because we’re making it at home, we know what’s going into it.
- Wonderfully crispy: You get all the crunch of fried chicken but baked in the oven! No deep frying required.
- Quick and easy: All you need are a handful of simple ingredients and basic prep, and it’s ready in no time for an easy weeknight dinner.
What people are saying:
![]()
“WoW – Absoltely FanTAStic!!! A random search on Google led me to your site and after seeing the huge numbers of high ratings, decided to give it a shot. SO GLAD I did – crispy yet juicy and spot on flavor. With a real feel of -22 in ND, this was Exactly what I needed. Highlight of my weekend 😁” Gabriella
Oven-Fried Chicken ingredients:

- Chicken breast: One batch of this recipe makes about 3-4 chicken breasts, or around one and a half pounds, cut into strips. One chicken breast equals about three strips, the way I cut them. You could also use tenders, thighs, or legs!
- Eggs: Coat your chicken with beaten eggs to help the coating stick more.
- Butter: Salted or unsalted butter is fine.
- Flour: All-purpose flour helps coat the chicken to produce a crispy exterior! You can swap with gluten-free flour if needed.
- Panko: Panko breadcrumbs give the chicken a crunchy, crispy coating. For a gluten-free option, you can use pork rind panko!
- Seasoned salt: This versatile seasoning goes with everything! I use Lawry’s brand, but feel free to use your favorite brand.
- Paprika: It isn’t spicy, but it adds depth of flavor, a slight sweetness, and lots of color. You could add a dash of cayenne pepper to make it spicier if you like!
How to make fried chicken in the oven:
This recipe is the best way to enjoy fried chicken at home! For the full list of recipe instructions, scroll down to the recipe card below.
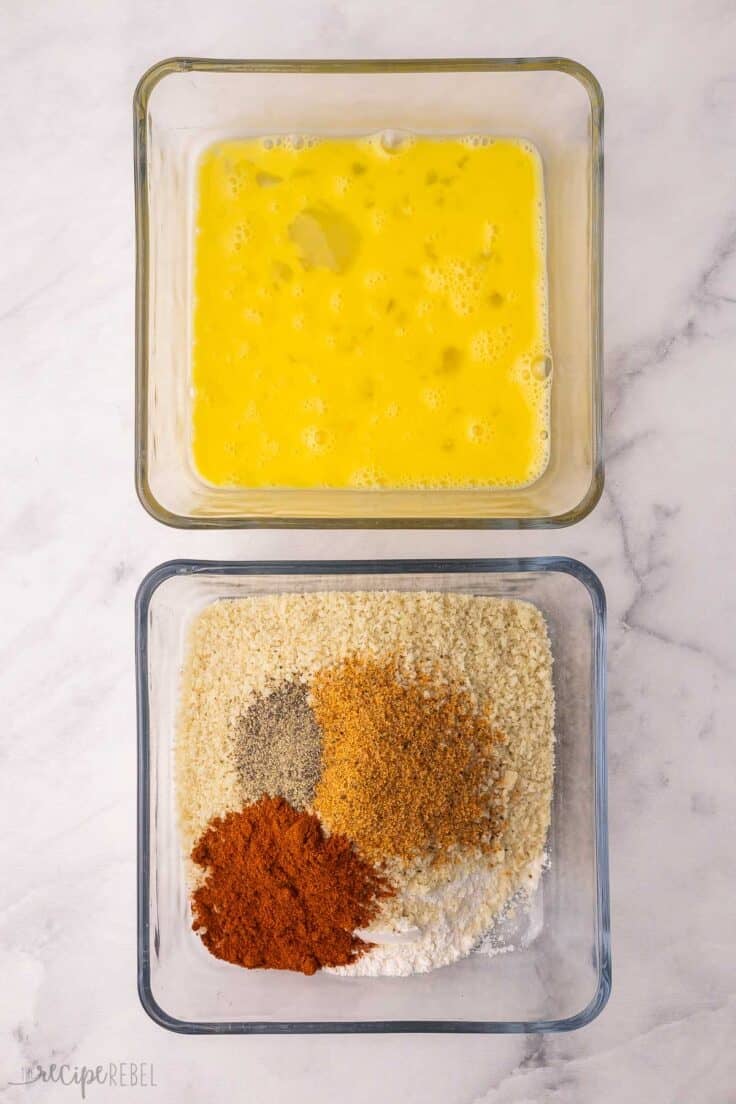
- Whisk the eggs in a shallow dish. Mix the coating by combining bread crumbs, flour, and seasonings in another shallow dish.
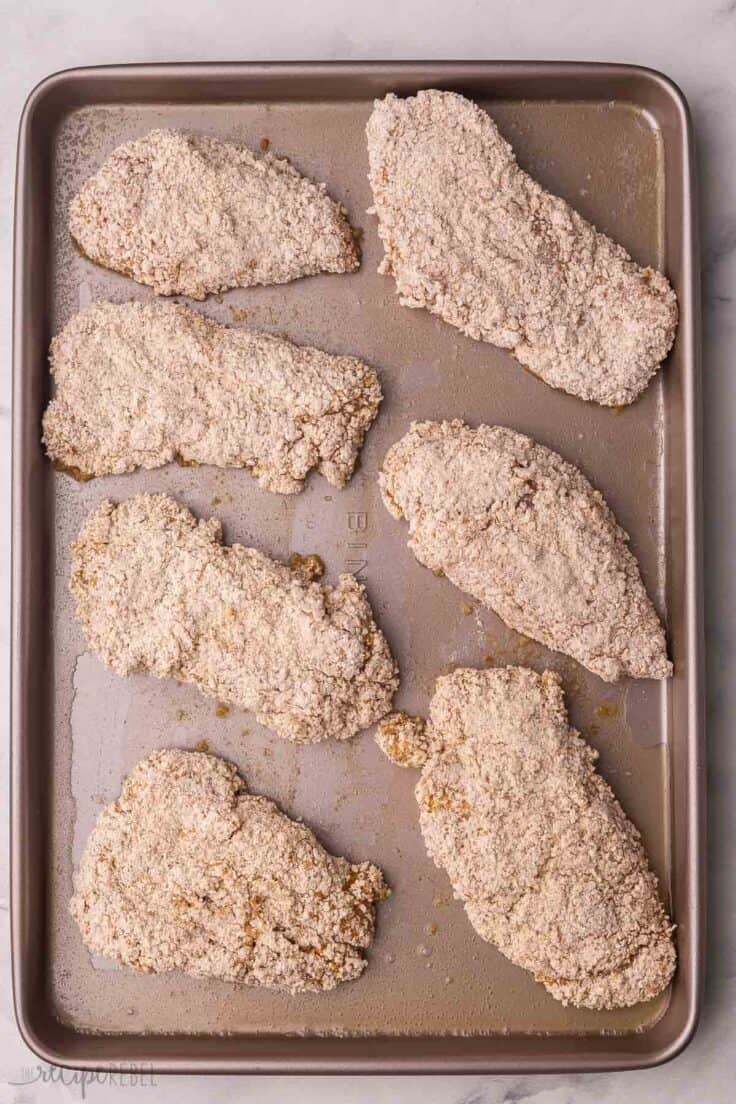
- Coat the chicken by dipping each piece in the egg, then pressing it into the breadcrumb mixture. Bake the chicken until it’s golden brown and crispy.
Quick things to remember:
- Cooking time: Depending on the size and thickness of your chicken pieces, you may need to adjust the cooking time, so always check your chicken for doneness before diving in.
- Add oil: If the pan is dry when you flip the chicken, add a drizzle of oil, to the to ensure the bottom pieces of chicken get crispy.
How to store leftover chicken:
To refrigerate leftover chicken, allow it to cool on a wire rack or paper-towel-lined plate. Then transfer the cooled pieces into shallow, airtight containers. Store in the fridge for 3 to 4 days.
To freeze, place the chicken in a single layer on a tray in the freezer until frozen solid. Then, transfer the frozen pieces to freezer bags and store them in the freezer for up to 3 months.
To reheat Oven-Fried chicken, place chicken pieces on a wire rack on a baking sheet and place in the oven at 250 degrees just until heated through.

Why is my baked fried chicken not crispy?
While baking chicken isn’t always known for crispy results, this recipe really does deliver a crispy “fried” main course right out of the oven! Still, I wanted to add some tips that might help if you find that your chicken is not as crispy as you’d like.
- Use Dark, Non-Stick Pans. Dark pans heat to a higher temperature than light-colored pans, which will help with getting a crispy coating. Make sure the pan and butter are hot when you add the chicken.
- Use Butter, Not Cooking Spray. I know you might be tempted to bake the chicken with cooking spray instead of butter, but unfortunately, this just doesn’t work as well. The fat in real butter makes a lot of difference in crisping up the chicken! If you want, you can spray the other side of the chicken when you flip for extra insurance.
- Check when you flip: When you flip the chicken, you may find that the pan is a little dry. You can add more butter or oil to the pan to help crisp up the bottom of the chicken as it cooks.
- Serve with Care: As the chicken sits on a plate, the underside may get a little soggy from condensation. Therefore, I recommend serving immediately. If you’re not serving right away, place the chicken on a rack or a plate lined with a paper towel, or just keep it warm in a 225°F oven.
Make-ahead option:
You can make the breading mixture and bread the chicken pieces, and then “flash freeze” them on a tray in the freezer until frozen solid.
From there, transfer the breaded frozen chicken to freezer bags, and keep for up to 3 months frozen. There’s no need to thaw them before baking, but you will need to add more cooking time (around 2 to 5 additional minutes per side, depending on the thickness of the chicken).
Serving Suggestions:
When it comes to serving Oven-Fried Chicken, I like to go with classic, comforting sides, like baked beans and slow cooker mashed potatoes! If you want to add some veggies, you can’t go wrong with some glazed carrots.
Every once in a while, I like to go for something more indulgent and make my cream cheese mashed potatoes!
More baked chicken recipes:
- Baked Chicken Wings — perfect for a party!
- Baked Chicken Breast — SO juicy.
- Baked Chicken Thighs — perfectly crisp skin.
- Baked Chicken Drumsticks — the kids love these!
The Best Oven-Fried Chicken
written by Ashley Fehr

Ingredients
- 2 eggs
- 1 cup panko bread crumbs
- ¾ cup all-purpose flour
- 1 tablespoon seasoning salt
- 2 teaspoons paprika
- ½ teaspoon pepper
- 2 pounds boneless skinless chicken breasts, , cut into strips (about 3 or 4 breasts)
- ¼ cup unsalted butter, plus more if needed
Instructions
- Preheat the oven to 425°F.
- In a shallow dish, whisk the eggs.
- In a second shallow dish, combine the bread crumbs, flour, seasoning salt, paprika, and pepper.
- Coat each piece of chicken in the egg, then in the bread crumb mixture, pressing on firmly to adhere. Place the chicken on a plate and repeat until all the chicken is coated.
- To a rimmed baking sheet, add the butter and put the pan in the oven to melt the butter. (You want the pan to get hot, but be careful not to burn the butter.)
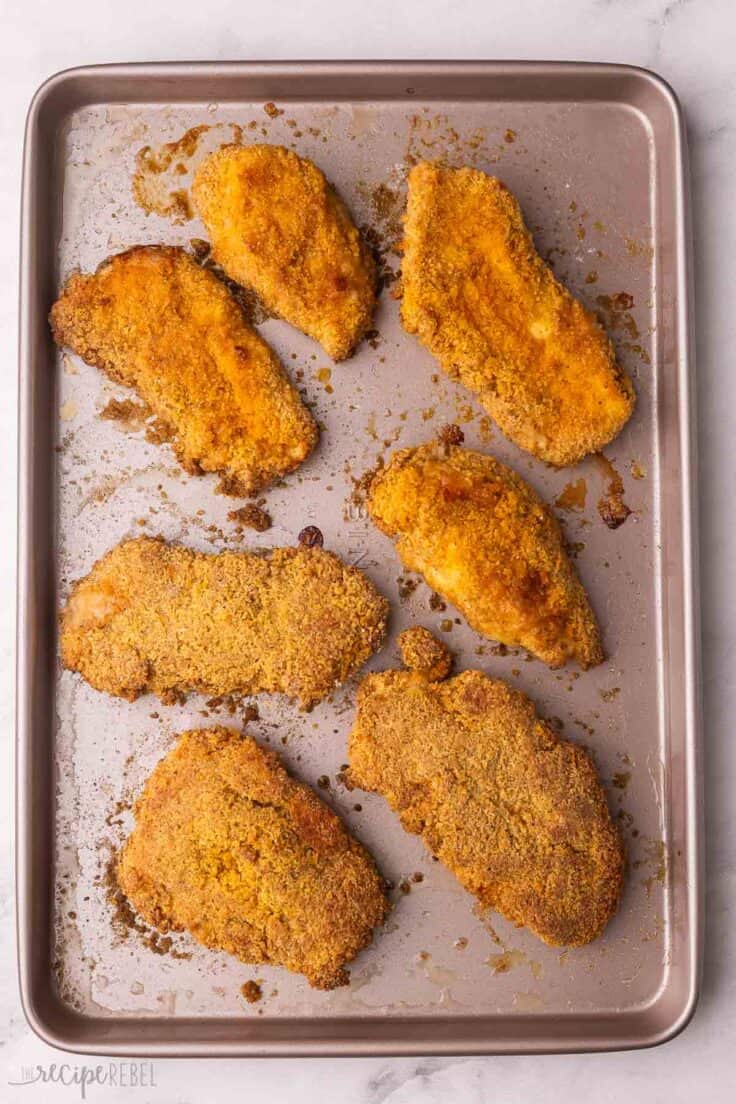
- Place each piece of chicken on the hot pan, leaving a good amount of space in between. Bake for 20 minutes, flipping gently halfway through, or until cooked through and a meat thermometer inserted into the chicken reaches at least 165°F and the coating is browned. If necessary, add another dab of butter when flipping.
- Remove from pan and serve immediately.
Video
Notes
Nutrition
Nutrition information is automatically calculated, so should only be used as an approximation.
Want to save this recipe?
Create an account easily save your favorite content, so you never forget a recipe again.
Tried this recipe?
Tag @thereciperebel or hashtag #thereciperebel — I love to see what you’re making!
Tag @thereciperebel
Youko says
I did this, but subbed out the milk for egg when I was double dipping my strips and butter with olive oil. Worked out pretty great!
Ashley Fehr says
I’m so glad!
Cynthia taffet says
Hi. I want to try this. Can you clarify the oven temperature. The video says 450 but the recipe says 425 degrees. Can’t wait to try these look delicious
Cyn
Ashley Fehr says
425 is correct but you can bake it at 450, it will just be done a little quicker.
Dave says
Hey! Just wondering if this can be made dairy free? Any way to make this without the milk and butter? Thanks!
Ashley Fehr says
You could use dairy free milk and vegan margarine!
Kate says
Tried this for the first time tonight, and the family loved it. However I think next time I’ll try the double-coating, as my coating didn’t stick as well as I thought it would (possibly because I made my own breadcrumbs and they were too soft.) I also used my own spices rather than the seasoned salt – I added some cayenne pepper and turmeric along with the paprika. (The turmeric gave it a nice color!)
Thanks for a great recipe.
Ashley Fehr says
Thanks Kate! I’ve never tried with homemade bread crumbs but I think that may have been the problem. I’d love to hear if you give it another go!
Pat says
Ok, this is not you said how to do it but…..
Soaked my chicken strips in buttermilk then into the breading, back out and into a bowl if melted butter and back into the breading. Used my air fryer….so, so good! Just a tad salty this way so next time I will use less salt. Oh my goodness…loved it!
Ashley Fehr says
Thanks Pat! And thank you for sharing your tips!
Gina says
How long did you air fry them?
Toni says
I really loved how crispy it was! Really amazing!
Ashley Fehr says
Thanks Toni!
Eden says
It’s amazing! We loved it!
Ashley Fehr says
Thanks Eden!
Lori says
The whole family likes this one- so easy and good!
Ashley Fehr says
Thanks Lori!
Kara says
So flavorful and juicy! I’m not a fan of frying foods (I always burn myself), so I love this method. My family all loved it!
Ashley Fehr says
Yes! We love this way much more!
Dorothy at Shockinglydelish says
Look how beautifully crispy it is! I love that it is baked and not fried.
Tricia says
I wanted to print and make this but then I saw the sodium as over 2,000mg! That is so high, is their a way to reduce this count or replace anything, maybe the seasoned salt for something else. I would like to try this out. Let me know. Thank you. Your blog is great I have tried maybe things from it.
Ashley Fehr says
Thanks Tricia! The nutrition information will actually be significantly lower because there will be coating left over in the dish. It’s just difficult to estimate exactly how much will be left over. You can easily leave out the 1/2 teaspoon salt and it will still be flavorful!
Michelle says
This was really tasty! I made mine gluten free by using Bob’s Red Mill Gluten Free 1 to 1 Baking Flour. Another company makes GF panko crumbs, but I just left it out. I might try it another time or a crushed cereal. Thank you for this recipe. It is a keeper for us. I didn’t use the regular salt…
Ashley Fehr says
Thanks Michelle!
Sam says
I’ll try this, minus the salt mine. A T of Lawry’s & a 1/2 t of table salt is.2320 mg. of sodium. I T of Trader Joe’s seasoning salt is 270 mg. of sodium & I’ll omit the regular salt & save over 2000 mg. of sodium.
Ashley Fehr says
I’ll have to try the Trader Joe’s version if I can get ahold of it sometime!
Michelle says
Good idea! Thank you for sharing!
Duska says
I just saw this today so have not made it yet. Sounds delicious, but I have a question. For another meal iI purchased b-less, s-less chicken breasts this week. Wonder if anyone tried them and other than time to coook, any change I should make?
Ashley Fehr says
Hi Duska! The recipe calls for boneless, skinless chicken breasts, so if that’s what you are using then no changes would be needed 🙂
Darlene says
I’d love to try this but the sodium is really high. Any recommendations on how I can cut back on the sodium level in this dish? Thanks!
Ashley Fehr says
You can reduce the seasoning salt and replace it with additional spices if you prefer!
Jake says
Read all the comments. Single dad tried it for my daughter. Cooked a little longer and omg it was delicious… made me look like a top chef.lol.
Ashley Fehr says
I’m so happy to hear that!
Gail Plaskiewicz says
I love, love, love, love fried chicken! However, most recipes for baked chicken usually have them coated in mayo or something like that which I don’t like at all! Yours doesn’t have any of that & I can’t wait to try this recipe! If it tastes like I think it will, I will be thanking you for life!
Gail Plaskiewicz says
What I meant about coated in mayo is you coat it in that before you coat it in breadcrumbs. I just wanted to make that clearer.
Ashley Fehr says
Thanks Gail! I would love to hear your thoughts after you try it!
Annette says
Recipe mentions “have a little butter left over”, when is this extra used? Do you brush it on top of the chicken once it’s in the pan? Just wanted to make sure before I attempt to make. Sounds delicious and we love KFC so looking forward to trying.
Thanks.
Ashley Fehr says
There will be a little extra butter on the pan — a little bit sitting. But it’s important for that crispy coating!
Kelly says
I agree with the instructions being different. I also dont remember the parchment paper and I think we melted the butter on the pan in the oven and then added the chicken? Also there wasnt panko. Not that panko is bad. But this recipe is different from before. It has been a couple years since I have made it. But I do have it in my fitness pal and the ingredients are different. It’s been seven in my pinterest. Maybe it somehow got changed.
Ashley Fehr says
It has seen a couple adjustments over the 4 or 5 years it’s been here but nothing drastic — only extra tips to improve the texture and guarantee success 🙂
Wendy says
I do not have parchment paper can I use foil or waxed paper?
Ashley Fehr says
You can skip the parchment, it just ensures there is no sticking! Just make sure you have a good layer of butter on the pan 🙂