
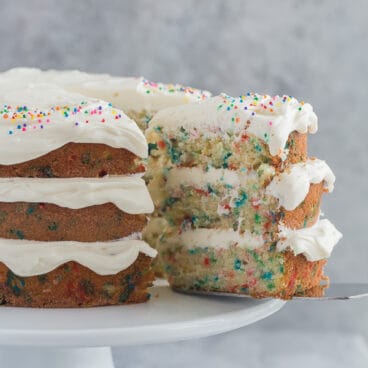
This homemade Funfetti Cake is so easy to make — just one bowl and a whisk! It’s fluffy, moist and layered with cream cheese whipped cream and more sprinkles!

It’s been a while (a long, loooooong while) since I’ve shared a cake recipe around here.
It’s been even longer since I shared a real-deal, 3 layer cake suitable for any special occasion.
It’s not that I don’t like cake (trust me on this one), it’s just that I’ve gradually switched my focus around here to Real Food: quick, mostly healthy meals that you can feed your family any night of the week or special guests on a weekend.
Everyday food.
Because I’m passionate about feeding our families well (<– but don’t think for a second this doesn’t include cake).
But I’m busting out this homemade Funfetti Cake here for my own special occasion: The Recipe Rebel turns FIVE today.
5.
Years.
How this happened, I have no idea, and I don’t really want to write 2000 words on why I am so filled with gratitude I could drop and cry right this instant (though it’s true). Because I know 99% of you are here for the cake 😉
I will say that when I started this blog, I was a pregnant, high school teacher with a 2 year old at home.
And now? I’ve been working on my blog full time for more than 3 years, and this year my husband has joined the team full time. It’s surreal to get to do this together, and focus on spending more time with our kids while they are young.
We are so, super, crazy thankful.
Here’s to the next 5 years!

So the first time I made this funfetti cake, I made it with a traditional buttercream frosting but I kind of went a little too far with the experimenting and messed it up.
It ended up way too sweet with not a great texture, and reminded me that (in my old age) I’m not the biggest fan of frosting to begin with.
These days, I will take whipped cream or cream cheese anything over too-sweet buttercream, and I decided that since IT’S MY BIRTHDAY, I get to do it how I want.
Which is why I layered this Funfetti Cake with light and fluffy cream cheese whipped cream (similar to the filling in the ever-popular Cherry Cheesecake Angel Food Cake Roll and Triple Berry Angel Food Cake Roll).
Simply because I wanted to.
This recipe is perfect for those who find traditional buttercream too sweet and want to mix things up!
How to make homemade Funfetti Cake:
- Butter and sugar first: cream the butter, oil and sugar together first until light and fluffy.
- Add the eggs, then the remaining wet ingredients.
- Add the dry ingredients — except the sprinkles — don’t overmix. We’re all about keeping things simple here! I stick to one bowl whenever I can.
- Fold in the sprinkles only right before baking. If the cake batter sits before baking, the color will leech out of the sprinkles and you will have one multi-colored cake, instead of delicate flecks of color.
- Bake, cool, and frost as desired.
Thoughts on sprinkles:
Regular multi-colored jimmies work best for this recipe as the super tiny sprinkles (nonpareil) will dissolve into the cake batter too quickly.
Avoid the overly large round sprinkles that come in some bottles because you don’t want your guests coming up against one when they’re expecting light and fluffy cake!

If you want to go all out with the sprinkles, save those for the top of the cake where they’ll have the most impact.
How far in advance can you make a Funfetti Cake?
You can make this funfetti cake up to 3 months in advance if you are freezing it, or up to 3-4 days if you are refrigerating it.
If you’re planning to make this recipe ahead, I recommend leaving the cream cheese whipped cream until the day of or day before serving — it unfortunately cannot be frozen.
If you need to make the entire thing in advance, I recommend using a traditional buttercream frosting as it will last in the refrigerator and the freezer just fine.

How to freeze Funfetti Cake:
As I mentioned above, this funfetti cake freezes perfectly. To do so:
- remove each layer from the pan and wrap tightly in plastic wrap or place in a ziploc freezer bag.
- Freeze on a flat surface where it will retain its shape.
- Keep frozen up to 3 months before frosting and serving.
- To thaw, let sit at room temperature for 2-3 hours before frosting and assembling.
Funfetti Cake
written by Ashley Fehr
Ingredients
- ½ cup unsalted butter,, room temperature
- 1½ cups granulated sugar, (300g)
- ½ cup oil
- 4 large eggs,, room temperature
- 1¼ cups low-fat buttermilk
- 1 tablespoon vanilla extract
- 2 teaspoons baking powder
- ½ teaspoon baking soda
- ½ teaspoon salt
- 2¼ cups all-purpose flour,, fluffed and leveled (293g)
- ⅓ cup sprinkles
Whipped Cream Cheese Frosting
- 1 package cream cheese,, cold (8oz or 250g)
- 1¼ cups powdered sugar
- 1 teaspoon vanilla extract
- 2 cups heavy whipping cream,, cold

Instructions
- Preheat the oven to 350°F. Lightly grease three 8″ round cake pans and dust with flour if desired, tapping pan so that all excess flour is removed.
- In a large bowl with an electric mixer, beat the butter until smooth. Add the sugar and oil and beat for 2 to 3 minutes until combined.
- Add the eggs and beat until completely combined, scraping the sides of the bowl as necessary.
- Add the buttermilk and vanilla and beat on low speed until smooth.
- Add the baking powder, baking soda, and salt and beat on low speed until combined.
- Add the flour and mix, just until no visible streaks of flour remain. Stir in the sprinkles just before baking. Divide the batter between the prepared pans.
- Bake for 18 to 20 minutes, until a toothpick inserted in the center comes out clean. Let cool for 10 minutes before transferring to a wire rack to cool completely.
Whipped Cream Cheese Frosting
- In a medium bowl with an electric mixer, beat the cold cream cheese until smooth.
- Add the sugar and vanilla and beat until combined, scraping down the bowl as necessary.
- Add the cream, a little bit at a time, and beat on low speed until incorporated. Turn the mixer to high and beat until fluffy and thickened. (This doesn’t take too long, just a couple minutes! Over-mixing will make the whipped cream thin again, so watch carefully. When you pull the beaters out of the bowl and have stiff peaks, it’s ready.)
- Divide the frosting between the cake layers to assemble. Top with additional sprinkles, as desired.
Notes
Nutrition
Nutrition information is automatically calculated, so should only be used as an approximation.
Want to save this recipe?
Create an account easily save your favorite content, so you never forget a recipe again.
Tried this recipe?
Tag @thereciperebel or hashtag #thereciperebel — I love to see what you’re making!
Tag @thereciperebel
Cindy says
Would this work for cupcakes? Also, “jimmies” ? Are you from the east coast? When I ask for “jimmies” on my ice cream I get weird looks – most call them sprinkles.
Ashley Fehr says
I think it should work fine for cupcakes! I’m not from the east coast, and we usually call them sprinkles but I wanted to emphasize the difference in size. Jimmies are longer sprinkles that won’t dissolve in the cake batter 🙂
Emily W. says
Hi! I think this recipe sounds sooo good and want to try it! I don’t have 8 inch pans, however, I do have 9 inch. Should i do two 9 inch and bake for less time? Thanks so much!
Ashley Fehr says
I would probably do 3 9″ pans and bake quite a bit less, maybe check at 15 minutes? You could always do two 9″ pans but you’ll probably want to add more bake time — I would just keep an eye on the cakes and check every 5 minutes or so after 15 minutes.
Jenny Pedersen says
Hello! How much cake does this make? 2 round pans? Thanks!
Ashley Fehr says
3 8″ round cake pans
Zenab says
I made this cake and it turned out perfect!!! Every one just loved it! Thanks very much!!!
P.s I have a query, I have some left over cream cheese icing, how long can it last in the fridge?
Ashley Fehr says
It should last quite a while, maybe a week or two? You can also freeze it for a later use. I’m so glad you liked it!
Nancy | The Bitter Side of Sweet says
So proud of you! Congratulations!! BTW this cake looks AMAZING!!!
Ashley Fehr says
Thanks Nancy! <3